1. Introduction to modular documentation
This manual provides instructions on how to author modularly structured documentation based on user stories. The manual defines used terminology, describes components that form modular documentation, and instructs writers on how to use provided templates to turn user stories into modular documentation.
| As modular documentation imperatives continue to evolve, the details and recommendations in this guide might be modified. |
2. What’s new
The following list summarizes significant changes to the modular documentation standard over time.
For a complete list of changes, see the merged pull requests.
2026: February
-
Removed the Next steps section from the assembly guidelines and template to avoid a confusing order in DITA.
2025: October
-
Removed references to the
[discrete]tag for concept and reference modules. -
Updated the optional sections in the Procedure module section.
2025: September
-
Re-introduced the
[role="_abstract"]tag in the templates to mark a paragraph containing a DITA-compatible short description.
2025: April
-
Removed the Limitations section from the Procedure section.
-
Updated comments in the templates to guide migration preparations to DITA.
2024: January
-
Removed the
[role="_abstract"]tag from the templates (regression). #222
2023: December
-
Added the What’s new section to the Modular documentation reference guide. #214
-
Added references to the Short descriptions section in the Red Hat SSG to provide detailed guidelines for the introduction of an assembly or a module. #216
2023: September
-
Added guidance for solving the problem when both your assembly and the last module included in that assembly contain an Additional resources section to the modular documentation assembly template. #210
2023: August
-
Updated the name of the content type attribute in the templates from
:_content-type:to:_mod-docs-content-type:. #203
2023: May
-
Removed the module prefixes (
proc_,con_, andref_) from anchors (IDs) both in the reference guide and the module templates. #201
2022: September
-
Added guidance for assembly titles. #192
2022: August
2022: April
2022: March
2021: August
-
Changed the guidelines for concept modules to allow examples and simple actions in certain cases. #150
2021: June
-
Added guidance for text snippets and a convention that modules should not contain other modules. #161
2021: April
2021: January
-
Changed Verification steps to Verification and clarified the use of numbered lists in modules. #148
3. Understanding modular documentation
This chapter explains what modular documentation is and what it is not.
3.1. What modular documentation is
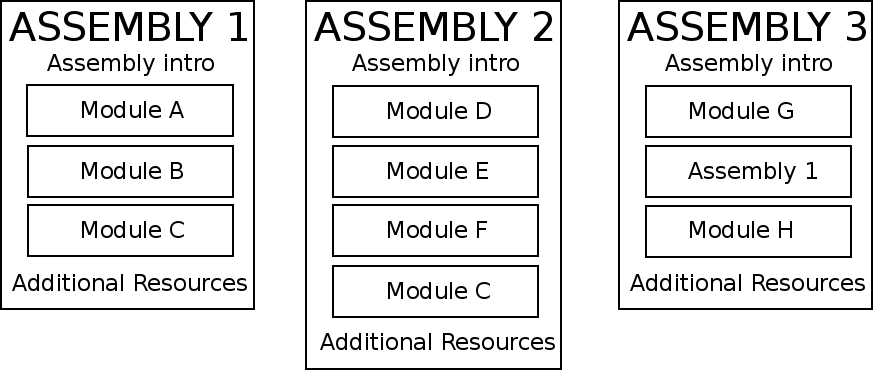
Modular documentation is documentation based on modules, which the writer combines into assemblies. An assembly can also include other assemblies. A module should not contain another module.
|
Nesting assemblies too deep can create too much complexity, which might make the documentation difficult to use and maintain. If you are worried this might be the case, consider linking to another assembly as an alternative to direct inclusion. |
At Red Hat, we write modular documentation that is based on user stories. This means that each assembly documents a user story.
-
For definitions of the terms we use, including modules, assemblies, and user stories, see Modular documentation terms and definitions.
3.2. What modular documentation is not
- Legacy (non-modular) documentation split into small, meaningless pieces
-
A module must make sense and provide value on its own, even when read separately from the other modules. The templates included in this manual help ensure this.
- A collection of modules that have no relationship to one another
-
An unorganized set of modules is confusing to users. That is why we combine modules into:
-
Assemblies that are based on user stories
-
Deliverables, like a book or help system, that present a structured view of the body of knowledge represented by a set of modules
-
- Always a linear, book-type model
-
Modular documentation is designed to enable you to deliver content flexibly. You can combine modules to build lean, article-based content or large, linear books.
3.3. Modular documentation repositories
Due to many factors that determine repository design for individual products, these modular documentation guidelines do not provide a strict documentation repository template.
For a general repository structure used by documentation teams at Red Hat, see the example documentation repository and README file in the mod-doc-repo-example branch in this repository.
4. Writing modular documentation
Assemblies can include various types of modules. Use the instructions in the following sections to create modules and combine them into assemblies.
4.1. Creating modules
Follow these guidelines to create different types of modules:
A module should not contain another module. However a module can contain a text snippet. For information about text snippets, see Using Text Snippets.
See Module and assembly examples for real-world examples of assemblies, modules, and their individual parts.
4.1.1. Concept modules
This section explains what a concept module is and provides recommended practices for writing concept modules.
Concept module definition
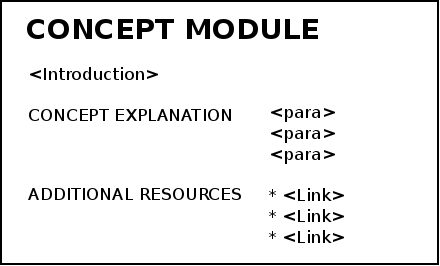
A concept module is an "understand" module. Concept modules give the user descriptions and explanations needed to understand and use a product.
Concept module guidelines
The core requirement for a concept module is explaining the idea, or concept. A concept module requires a short introduction and optionally, can also include additional resources.
When planning a concept module, look at nouns in related procedure modules and assemblies to find the concepts to explain to users. Explain only things that are visible to users. Even if a concept is interesting, it probably does not require an explanation if it is not visible to users.
Concept introduction
The introduction to a concept module is a single, concise paragraph that provides a short overview of the module. A short description makes the module more usable because users can quickly determine whether the concept is useful without having to read the entire module.
The introduction typically answers the following questions:
-
What is the concept?
-
Why should the user care about the concept?
For details and examples, see the Short descriptions section in the Red Hat supplementary style guide.
Concept body
The concept body describes the subject of the concept module.
Apart from paragraphs, you can use other AsciiDoc elements, such as lists, tables, or examples. Consider including graphics or diagrams to speed up the understanding of the concept.
Avoid including instructions to perform an action. Action items belong in procedure modules. However, in some cases a concept or reference module can include suggested actions when those actions are simple, are highly dependent on the context of the module, and have no place in any procedure module. In such cases, ensure that the heading of the concept or reference remains a noun phrase and not a gerund. For example, see "Bound variables in patterns and constraints" and the sections that follow it. These concept and reference modules contain actions that are not suitable for standalone procedure modules but are relevant actions to understand in the context of the concept or reference being described.
See also The DITA Topic Types at _informationmapping.com for more information about different types of conceptual information: principle, concept, structure, process, and fact.
If the concept module is large and complex, consider splitting the concept module into multiple standalone concept modules. If you cannot split the module into meaningful standalone modules, consider using subheadings in the module to structure the content for improved reader navigation. In many cases, subheadings are helpful to include in the table of contents to improve content searchability.
= My concept module

Concept introduction and body

== My concept module subheading

More concept body content| You can use subheadings in concept or reference modules, but not in procedure modules. |
Concept additional resources
The optional additional resources list links to other material closely related to the contents of the concept module, for example, other documentation resources.
Focus on relevant resources that might interest the user. Do not list resources for completeness.
Additional resources
-
Download the concept module template (adoc file) for new projects.
-
For real-world examples of concept modules, see Concept module examples.
4.1.2. Procedure modules
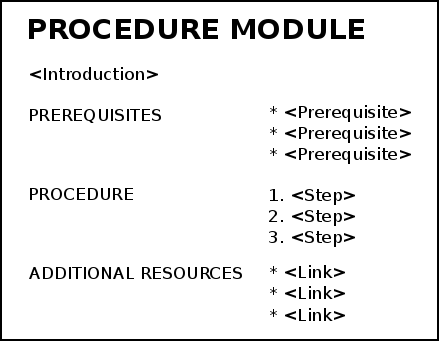
Procedure modules explain how to do something. A procedure module contains numbered, step-by-step instructions to help users accomplish a single task. Sometimes those tasks include substeps. Procedure modules must include a title, a brief introduction, and one or more steps in the form of imperative statements. Procedure modules can also contain the following sections:
Do not change or embellish these subheadings. Do not create additional subheadings.
The title of a procedure module is a gerund phrase, such as Deploying OpenShift Container Platform.
The procedure introduction is a short paragraph that provides an overview of the module. The introduction includes what the module will help the user do and why it will be beneficial to the user. It includes key words that relate to the module to maximize search engine optimization.
The introduction typically provides context for the procedure, such as:
-
Why and where the user performs the procedure
-
Special considerations specific to the procedure
For details and examples, see the Short descriptions section in the Red Hat supplementary style guide.
This section is optional. Prerequisites are a bulleted list of conditions that must be satisfied before the user starts the procedure. Use a bulleted list for prerequisites and the plural heading Prerequisites, even if your procedure only has a single prerequisite.
Prerequisites can be full sentences or sentence fragments; however, prerequisite list items must be parallel.
Focus on relevant prerequisites that users might not otherwise be aware of. Do not list obvious prerequisites. If a prerequisite applies to all of the procedures in a user story, consider listing the prerequisite in the assembly file. If you do this, consider including the prerequisite in the procedure module as a comment.
This section is required. The procedure consists of one or more steps required to complete the procedure. Each step describes one action written in the imperative form, for example, 'Do this action'. For single-step procedures, use an unnumbered bullet instead of a numbered list.
| Not all numbered lists in documentation are procedures. You can also use numbered lists in any module type for non-procedural sequences, such as a process flow of system actions. |
This section is optional. It provides the user with one or more steps to verify that the procedure provided the intended outcome, for example:
-
An example of expected command output or a pop-up window that the user receives when the procedure is successful
-
Actions for the user to complete, such as entering a command, to determine the success or failure of the procedure
This section is optional and not used often. List any actions that can help with troubleshooting the procedure. This subsection should be short. Consider whether the information might be better in a separate troubleshooting procedure or as part of a reference module that contains other troubleshooting sections.
This section is optional. Provide links to resources that contain instructions that might be useful to the user after they complete this procedure.
| Do not use Next steps to provide a second list of instructions. |
This section is optional. The listed resources link to other material closely related to the contents of the module, such as other documentation resources, instructional videos, or labs.
Focus on relevant resources that might interest the user. Do not list resources for completeness. If a resource applies to all of the modules in a user story, consider listing the resource in the Additional resources section of the assembly file. If you do this, consider including the resource in the procedure module as a comment.
Additional resources
-
Download the procedure module template (adoc file) for new projects.
-
For real-world examples of procedure modules, see Procedure module examples.
4.1.3. Reference modules
This section explains what a reference module is and provides recommended practices for writing reference modules.
Reference module definition
Reference modules provide data that users might want to look up, but do not need to remember.
-
A list of commands that users can use with an application
-
A table of configuration files with definitions and usage examples
-
A list of default settings for a product
For documentation on how to cross the road, you could create these modules:
-
Concept modules:
-
What are roads
-
What are crossings
-
-
Procedure modules:
-
How to put one foot in front of another
-
How to use pedestrian traffic lights
-
How to see if the road is clear for crossing
-
-
Reference modules:
-
Crossing signals
-
Common crosswalk pavement markings
-
Crossing laws by country
-
Reference module guidelines
The required part of a reference module is the reference data. A reference module requires a short introduction.
Reference introduction
The introduction to a reference module is a single, concise paragraph that provides a short overview of the module. A short description makes the module more usable because users can quickly determine whether the reference is useful without having to read the entire module.
For details and examples, see the Short descriptions section in the Red Hat supplementary style guide.
Reference body
A reference module has a very strict structure, often in the form of a list or a table. A well-organized reference module enables users to scan it quickly to find the details they want.
To make the reference data easier to scan, organize it in a logical order (such as alphabetically) or as a table. AsciiDoc markup to consider for reference data:
If you have a large volume of the same type of information to document, use a structure into which the information details can fit, and then document each logical unit of information as one reference module. For example, think of man pages, which document very different information details, but which still use consistent titles and formats to present those details in a uniform information structure.
If the reference module is large and complex, consider splitting the reference module into multiple standalone reference modules. If you cannot split the module into meaningful standalone modules, consider using subheadings in the module to structure the content for improved reader navigation. In many cases, subheadings are helpful to include in the table of contents to improve content searchability.
= My reference module

Reference introduction and body

== My reference module subheading

More reference body content| You can use subheadings in concept or reference modules, but not in procedure modules. |
Additional resources
-
Download the reference module template (adoc file) for new projects.
-
For real-world examples of reference modules, see Reference module examples.
-
For advice on when to use lists and when to use tables, see Let’s bring <table> to the table, again.
4.1.4. Text snippets
A text snippet is a section of text that is stored in an AsciiDoc file. Text snippets contain content that is reused in multiple modules or assemblies.
| A text snippet is not a module. It cannot include structural elements of a module such as an anchor ID or an H1 heading. |
-
One or more paragraphs of text
-
A step or series of steps in a procedure
-
A table or list
-
A note, for example a disclaimer for technology preview or beta releases
Table 1. Types of notes Note type Suggested content NOTE
Additional guidance or advice that improves product configuration, performance, or supportability.
IMPORTANT
Advisory information essential to the completion of a task. Users must not disregard this information.
WARNING
Information about potential system damage, data loss, or a support-related issue if the user disregards this admonition. Explain the problem, cause, and offer a solution that works. If available, offer information to avoid the problem in the future or state where to find more information.
-
Create the text snippet AsciiDoc file.
Consider storing snippet files in a separate snippets folder. -
Indicate that the file is a snippet in one of the following ways:
-
Prefix the file name with
snip-orsnip_:snip-beta-note.adoc -
Add a variable to the snippet file that identifies its content type:
:_mod-docs-content-type: SNIPPET
-
-
Add an
include::statement to the file that you want to add the snippet to, for example:include::snippets/snip-beta-note.adoc[]
4.1.5. File names and anchors
To optimize modular documentation, follow these guidelines for naming files and creating anchors:
Create assembly and module file names that accurately and closely reflect the title of the assembly or module. Create file names with the format prefix-filename.adoc or prefix_filename.adoc where prefix is one of the following module prefixes:
-
con: Concept module prefix -
proc: Procedure module prefix -
ref: Reference module prefix -
assembly: Assembly module prefix
-
con-guided-decision-tables.adoc(Concept module) -
con_guided-decision-tables.adoc(Concept module) -
proc-creating-guided-decision-tables.adoc(Procedure module for creating) -
proc_creating-guided-decision-tables.adoc(Procedure module for creating) -
ref-guided-decision-table-examples.adoc(Reference module with examples) -
ref_guided-decision-table-examples.adoc(Reference module with examples) -
assembly-designing-guided-decision-tables.adoc(Assembly of guided decision table modules) -
assembly_designing-guided-decision-tables.adoc(Assembly of guided decision table modules)
|
Do not include special characters in file names. Ensure that all members of your team use the same file naming conventions. |
These file naming guidelines are optional but highly recommended. However, if your team does not include the module prefixes in file names followed by either a hyphen (-) or an underscore (_), include one of the following variables in each file before the anchor ID:
:_mod-docs-content-type: ASSEMBLY
:_mod-docs-content-type: PROCEDURE
:_mod-docs-content-type: CONCEPT
:_mod-docs-content-type: REFERENCE
:_mod-docs-content-type: SNIPPETAt the top of every module, provide an anchor in the format [id="filename_{context}"] where filename is the exact name of the file, without the file extension (.adoc) and a module prefix. Module anchors are necessary so that Asciidoctor can identify the module when the module is reused or cross-referenced. The context variable is defined in each assembly module, such as :context: my-context-value. When you build an assembly, the value of the context variable replaces context in each module anchor ID and is displayed in the generated URL.
[id="filename_{context}"]
= Module heading

The first sentence of the topic.[id="guided-decision-tables_{context}"]
= Guided decision tables
The guided decision tables feature works similarly to…[id="creating-guided-decision-tables_{context}"]
= Creating guided decision tables
You can use guided decision tables to…|
The previously defined anchor format is the most stable and versatile of anchor formats, and supports variables that enable topics to be reused and cross-referenced correctly. For details, see Reusing modules in assemblies. Other anchor formats include |
4.2. Forming assemblies
This section explains what an assembly is and provides recommended practices for forming assemblies.
4.2.1. Assembly definition
An assembly is a collection of modules that describes how to accomplish a user story. See also Understanding modular documentation.
4.2.2. Assembly guidelines
The required parts of an assembly are the introduction and modules. Optionally, an assembly can also include prerequisites and additional resources.
Assembly title
If the assembly describes a task and includes one or more procedure modules, start the title with a verb in the gerund form, such as Creating or Configuring, for example Encrypting block devices using LUKS. If the assembly does not include any procedure modules, use a noun phrase, for example Red Hat Process Automation Manager API reference.
Assembly introduction
The introduction explains what the user accomplishes by working through the assembled modules. It typically provides context for the assembly.
Consider rewording the user story to write the assembly introduction, for example:
-
User story: As an administrator, I want to provide external identity, authentication and authorization services for my Atomic Host, so that users from external identity sources can access the Atomic Host.
-
Assembly introduction: As a system administrator, you can use SSSD in a container to provide external identity, authentication, and authorization services for the Atomic Host system. This enables users from external identity sources to authenticate to the Atomic Host.
For details and examples, see the Short descriptions section in the Red Hat supplementary style guide.
Assembly prerequisites
Prerequisites are conditions that must be satisfied before the user can start following the assembly and are applicable to all the modules in the assembly.
Use the second level heading syntax for the Prerequisites section in the assembly so that it is displayed in the table of contents and is consistent with the Additional resources or Next steps sections in the assembly.
Assembly modules
To include modules in an assembly, use the Asciidoc include directive. Use any combination of concept, procedure, and reference modules that fulfills the purpose of the assembly. Use the leveloffset attribute to set the hierarchy of the module relative to the assembly, as shown in the following example:
file1.adoc[leveloffset=+1]
file2.adoc[leveloffset=+2]
file3.adoc[leveloffset=+3]
All module and assembly titles must use the H1 heading designation, such as = My heading.
Additional resources
This section is optional. The listed resources link to other material closely related to the contents of the module, such as other documentation resources, instructional videos, or labs. To ensure the content is DITA-compatible, do not use any non-link text in this section.
Focus on relevant resources that might interest the user. Do not list resources for completeness. If a resource applies to all of the modules in a user story, consider listing the resource in the Additional resources section of the assembly file. If you do this, consider including the resource in the procedure module as a comment.
| If you use Additional resources in an assembly file, check whether the last module in the assembly also has Additional resources. If so, view the rendered HTML and consider rewriting or reorganizing the assembly. |
4.2.3. Additional resources
-
Download the assembly template (adoc file) for new projects.
-
For real-world examples of assemblies, see Assembly examples.
4.2.4. Reusing modules in assemblies
When you create content in modules, you can use the same module multiple times in an assembly without having to replicate information in multiple source files. However, in order to facilitate module reuse, you must embed a document attribute variable in the anchor name for the module and then define that variable in the assembly each time the reused module appears. If the variable is not embedded and assigned, an error appears at build time reporting the duplicated anchor ID.
|
To determine which assemblies include a specific file, you can use your code editor to search the doc repo for instances of the file name. The search results will list every |
ID "$ANCHOR_NAME" is duplicated in the source content
$BUILD_PATH fails to validate
This error is resolved by adding and defining a document variable.
-
In the module file that will be reused, add the
{context}suffix with a hyphen to the anchor name in the format[id="anchor-name_writing-mod-docs"].Although you can use any document variable that clearly indicates the variable in question, such as {product}or{chapter}, the{context}variable is recommended. This variable indicates more generally that the same module can be reused in the specified "context" of one section of a document or another, regardless of whether that section is product-specific or not, whether it is a whole chapter or a small assembly, or some other limitation.Two modules to be reused: Module A and Module B[id="module-A-being-reused_{context}"] = Module A Heading[id="module-B-being-reused_{context}"] = Module B Heading -
In the assembly file or the master book file, define the
:context:variable immediately above any included modules that are being reused, in the format:context: variable-name. How you define the variable depends on whether the module is included once in multiple assemblies or is included multiple times in a single assembly. Note that the:context:variable definition uses hyphens to separate its terms.- Module included once in multiple assemblies
-
If the reused modules are included only once in this assembly and in at least one other assembly, define an assembly-level variable such as
:context: assembly-name. This indicates that the reused module is appearing in the context of that assembly.Assembly 1include::some-module-not-being-reused.adoc :context: assembly-1-name include::module-A-being-reused.adoc include::some-module-not-being-reused.adoc :context: assembly-1-name include::module-B-being-reused.adocAssembly 2include::some-module-not-being-reused.adoc :context: assembly-2-name include::module-A-being-reused.adoc include::some-module-not-being-reused.adoc :context: assembly-2-name include::module-B-being-reused.adoc - Module included multiple times in a single assembly
-
If a module is included multiple times in the same assembly, define a variable specific to a section or a chapter of that assembly, such as
:context: section-name. This indicates that the reused module is appearing in the context of that section of the assembly.Assemblyinclude::some-module-not-being-reused.adoc :context: section-1-name include::module-A-being-reused.adoc include::some-module-not-being-reused.adoc :context: section-2-name include::module-A-being-reused.adoc
-
Return to the reused module file, and at the top of the file add a comment that identifies which assemblies the module has been added to. This helps to track reused modules in the future.
[id="module-A-being-reused_{context}"]
= Module A Heading
Practical example 1: reusing modules in multiple assemblies
You want to reuse the "Creating Assets" procedure module and the "Projects" concept module in two assemblies: an "Asset Definitions" assembly and a "Business Rules" assembly.
The module files contain the following content:
[id="projects_{context}"]
= Projects[id="creating-assets_{context}"]
= Creating AssetsThe assembly files contain the following content:
include::organizational-unit.adoc

include::repository.adoc

:context: asset-definitions
include::projects.adoc

include::organizational-unit.adoc

include::creating-packages.adoc

:context: asset-definitions
include::creating-assets.adoc

include::adding-dependencies.adocinclude::business-processes.adoc
:context: business-rules
include::projects.adoc
include::project-types.adoc
include::packages.adoc
:context: business-rules
include::creating-assets.adocFor all cross-references to the reused modules, specify which context (assembly) you want to link to. For example, you can link to the "Creating Assets" procedure module as it appears either in the "Asset Definitions" assembly or in the "Business Rules" assembly. Create cross-references in the xref:anchor-name_context-variable-name[] format:
For details, see xref:creating-assets_asset-definitions[].or
For details, see xref:creating-assets_business-rules[].Practical example 2: reusing a module in a single assembly
You want to reuse the "Projects" concept module twice in the "Business Rules" assembly.
The module file contains the following content:
[id="projects_{context}"]
= Projects
The assembly file contains the following content:
:context: intro
include::projects.adoc

include::organizational-unit.adoc

include::asset-types.adoc

:context: asset-types
include::projects.adoc

include::dependencies.adoc
For all cross-references to the reused module, specify which context (section) you want to link to. For example, you can link to the "Projects" module as it appears either in the "Introduction" or in the "Asset Types" section. You create cross-references in the format xref:anchor-name_context-variable-name[]:
For details, see xref:projects_introduction[].or
For details, see xref:projects_asset-types[].4.2.5. Nesting assemblies in assemblies
When you set the :context: variable in an assembly, the variable continues to be set to the same value in the rest of the document even after the assembly itself ends. This causes problems if you include an assembly in another assembly.
If there is, for example, an Additional Resources section in the inner, included assembly as well as in the outer, including assembly after the include statements, the ID of the second one gets overwritten with the :context: variable of the included assembly. This causes duplicate IDs, which lead to build-time errors like:
asciidoctor: WARNING: 1.adoc: line 19: id assigned to section already in use: additional-resources-2
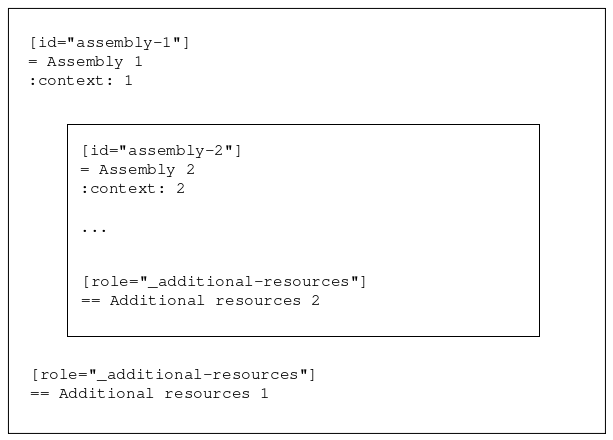
To solve this problem, restore the :context: variable to its previous value when assemblies end:
-
Add the following line at the top of your assemblies before
:context:is defined to save the inherited context:ifdef::context[:parent-context: {context}] -
Add the following lines to the end of your assemblies to restore the saved context, if one already existed:
ifdef::parent-context[:context: {parent-context}]
ifndef::parent-context[:!context:]
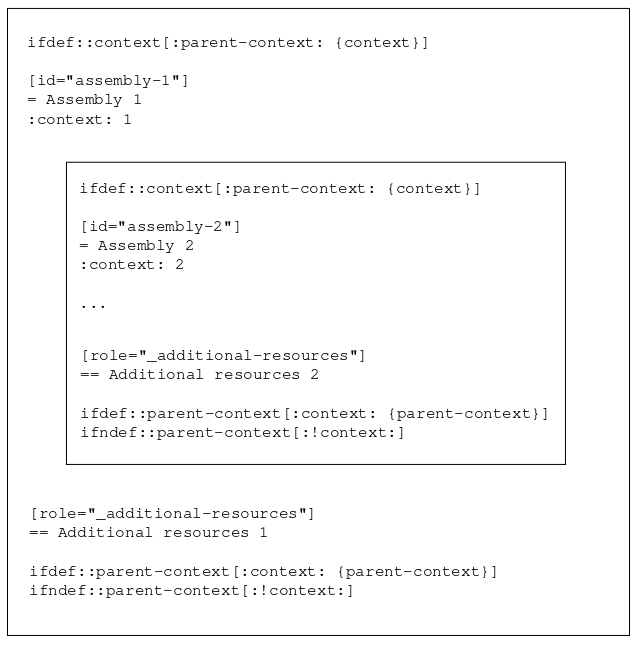
See also the assembly template for an example.
Appendix A: Modular documentation terms and definitions
- Assembly
-
A collection of several modules combined into a larger piece of text, preceded by an introduction that explains the purpose of the assembly.
The docs realization of a user story.
- Module
-
An independent, self-contained chunk of information with a well-organized structure. Each module is information that a reader can understand and use by itself. A writer can use a module as a standalone article or as part of a larger body of work (an "Assembly"). A module does not depend on other documents, but it can refer the reader to other documents as additional resources. Because a module is self-contained, it must have a clear title that briefly and clearly summarizes the subject of the module. Moreover, because modules are written as context-free elements independent of other modules, they are re-usable. One module can be part of multiple assemblies.
- Concept module
-
Explains a concept; for example, not action-based.
- Procedure module
-
Describes steps to perform an action.
- Reference Module
-
Presents detailed reference material, for example, command syntax.
- User story
-
A short description of something the user does to achieve a goal.
Example: As an administrator, I want to set up authentication to a critical system in my infrastructure, such as a gateway VPN, or accounting system to only allow users authenticated through strong authentication methods, such as two-factor authentication.
As opposed to a use case, which is a description of interactions between the system and the user or other systems.
Table 2. Contrasting user stories and use cases User Story Use Cases Definitions:
A short description of something the user does to achieve a goal.
A description of interactions between the system and the user, components of the system, or the system and other systems.
Views the situation from:
The perspective of a user.
The perspective of a product and its features.
Focuses on:
The outcome as perceived by the user.
What the product does and how it does it, which includes product requirements, specification, scope.
Example:
As an office worker, I want to be able to easily switch between standing and sitting, so that I prevent back pain and other health issues associated with prolonged periods of sitting at a computer.
This user story follows a common template for user stories in the form of "As a <type_of_user>, I want <some_goal> so that <some_reason>." Ergonomic work space solution - a standing desk that allows switching between standing and sitting. The standing desk:
-
Is motorized, with a button a person can press to adjust the height; the height must span up to 150 cm to be usable also by people 200 cm tall.
-
Is made from easy-to-clean and durable material to withstand standard office conditions, such as spilled tea or scratches: table top - polyester, legs - steel.
-
Has large enough work surface to comfortably fit 2 monitors, one laptop docking station, small personal items.
-
Can hold the weight of 100 kg, such as standard office equipment and a person sitting on the desk.
-
Meets safety requirements per EU standards for office equipment.
-
Has attractive design to fit in modern office spaces.
A use case like this can also include other ergonomic solutions, such as an adjustable sit-stand wall mount for monitors and compare their parameters, such as ease of installation, price, and ease of use. To fulfill their purpose, user stories must be defined based on customer needs. Therefore, they must be produced by customer-facing associates, such as product management or field teams, not by writers. Writers can only help polish the user stories if required.
If your team does not have user stories, do not write them yourselves. Instead, ask the stakeholders for your product to provide them to you.
-
- User story-based docs
-
Docs developed to support a user story. For our purposes, user-story-based docs are the same as use-case-based docs.
- Modular documentation
-
Documents structured into modules and assemblies.
| We do not use the terms topic or topic-based documentation because they are too ambiguous. A topic can mean a piece of documentation, a user story, or a short chunk of content. Therefore, topic-based can mean a number of things. |
Appendix B: Module and assembly examples
Appendix C: Converting to modular documentation
If you have a monolithic, feature-based manual, you can convert it to a set of modular content based on user stories. This conversion workflow involves using the customer product lifecycle to define user stories for your product, and creating the assemblies and modules necessary to fit each user story.
The result is documentation that is more relevant for your readers, because it is based on real-world user stories (it tells them how to accomplish their goals), and modular (it can be assembled into whatever sets and formats they might need).
-
You should understand what modular documentation is:
-
You should understand the benefits of modular documentation.
For example, see Documentation based on user stories.
-
Find a user story and practice documenting it as an assembly.
This process of breaking down user stories into assemblies and modules is an essential element of modular documentation. You should be familiar with this process before attempting to do it for an entire feature-based book.
-
Your repository should be set up.
If you are using AsciiDoc, your repository should have a directory structure that supports modular documentation, and you should have a
master.adocfile for each publication.
C.1. Overview of the customer product lifecycle
User stories are the basis of modular documentation. The modular documentation conversion workflow uses the customer product lifecycle to help you discover and develop the user stories that your documentation should include.
While all products are different, everyone tends to use them in a similar workflow that starts with the initial research to determine which product to use, includes implementing and managing the product, and ends when the product is no longer needed. This customer product lifecycle can be broken down into phases, each of which presents unique user information requirements (that is, the user needs different types of information at each phase of the lifecycle):
- Plan
-
What information should be gathered and what decisions should be made (for example, design/deployment) before the customer can start installing the product?
- Install
-
How does the customer install the product on each of the supported platforms?
- Configure and verify
-
After the product is installed, what does the customer need to do to configure it to work in their environment? How do they test or verify that it is ready to put into production?
- Develop and test
-
Does the customer need to develop any custom applications to connect the product to any of their existing infrastructure?
- Manage
-
Once the product is in production, how does the customer customize and change it on a day-to-day basis?
- Monitor and tune
-
Once the product is in production, how does the customer monitor its performance in order to know when changes are needed?
- Upgrade and migrate
-
How does the customer upgrade to newer versions of the product?
- Troubleshoot
-
How does the customer fix common problems they may encounter?
C.2. Defining user stories for your product
User stories provide the context and structure from which you can determine which assemblies and modules to create.
For more information about user stories, see Modular Documentation Terms and Definitions.
Ideally, well-defined user stories would already exist for the product you are documenting. For most writers, however, this ideal is not a reality. If you do not have any user stories from which to work, and you — as a writer — do not have all of the user information you would need to create the user stories yourself, how do you get started? This procedure provides a general approach that you can take.
Of course, every product differs in terms of tools, processes, team dynamics, and access to SMEs. Since you are most familiar with these aspects for your own team, you will need to adapt this general approach for your own team. Depending on your team structure, each step can be completed by either a writer or a collaboration between a writer and Content Strategist.
-
Identify the key, top-level user stories for your product.
This step should typically be performed by the Content Strategist.
Start with the customer product lifecycle phases. If you have existing user stories, ask yourself which ones correspond to phases in the lifecycle. If you do not have existing user stories, create a user story for each lifecycle phase that applies to your product.
For more information, see Overview of the Customer Product Lifecycle.
For example, here is a top-level user story for the Configure and Verify phase of the customer product lifecycle:
Example 6. Creating top-level user stories-
[Phase] Configure and Verify — [Top-level user story] As a system administrator, I want to configure PRODUCT so that it is ready for production.
-
-
Define the supporting user stories that are necessary to complete each of the top-level user stories.
This step should typically be a collaborative effort between the Content Strategist and the writer.
Each top-level user story represents a "phase" of the customer lifecycle. You should go through each phase and define the user stories needed to complete the phase. You will need to use your own knowledge and expertise of the product.
For example, for the Configure and Verify phase, users would need to know how to configure and set up each component or feature of the product to work in their environment. You could break it down like this:
Example 7. Creating second-level user stories-
As a system administrator, I want to configure PRODUCT so that it is ready for production.
-
As a system administrator, I want to enable PRODUCT to make and accept connections so that remote peers can exchange data with PRODUCT.
-
As a system administrator, I want to secure PRODUCT so that it can communicate with remote peers securely.
-
As a system administrator, I want to set up logging so that error conditions can be diagnosed.
-
At this point, you should have a two-deep list of user stories.
-
-
Go back through the list and add any additional user stories that might be needed to complete any of the secondary user stories.
Depending on the product, one or two levels of user stories might be sufficient. For larger, more complex products, you might find yourself going multiple levels deep.
Be careful not to go too deep, however. At this stage, you are not defining every procedure or step needed to complete each user story. User stories represent user goals, so you should only need to go deeper if a secondary user story has multiple goals.
For example, under the "Configuring Product X" example in the previous step, the logging user story does not need any additional user stories — the goal cannot be reduced any further than it already is. On the other hand, the adding security settings user story might be able to go a bit deeper. Security is a goal in and of itself (users want their applications to be secure), but there are more specific goals users might have within it:
Example 8. Creating additional user stories-
As a system administrator, I want to configure PRODUCT so that it is ready for production.
-
As a system administrator, I want to enable PRODUCT to make and accept connections so that remote peers can exchange data with PRODUCT.
-
As a system administrator, I want to secure PRODUCT so that it can communicate with remote peers securely.
-
As a system administrator, I want to add security certificates so that clients can be authenticated.
-
As a system administrator, I want to use my existing LDAP configuration so that clients can be authenticated.
-
-
As a system administrator, I want to set up logging so that error conditions can be diagnosed.
-
-
-
For each user story in your list, define the following:
-
What concepts does the user need to understand to complete the user story?
These will become the concept modules for the assembly.
-
What are the procedures to complete the user story?
These will become the procedure modules for the assembly.
-
Is there any reference information that the user might want to refer to when performing this user story?
These will become reference modules.
Example 9. Breaking down user stories-
As a system administrator, I want to configure PRODUCT so that it is ready for production.
-
As a system administrator, I want to enable PRODUCT to make and accept connections so that remote peers can exchange data with PRODUCT.
-
Concept: Types of connections
-
Procedure: Create "listeners" to accept incoming connections
-
Procedure: Create "connectors" to connect to outbound endpoints
-
Reference: Network connection configuration attributes
-
-
Additional user stories…
-
-
C.3. Creating assemblies
An assembly is a representation of a user story, so you need to create an assembly for each user story that you defined.
An assembly could represent an article, "chapter" in a book, or even an entire book. However, one of the benefits of modular documentation is that you do not need to worry about how the assembly will ultimately be used — each assembly represents a user goal, and once you create it, it can be "included" anywhere it is needed (a publication, within another assembly, and so on).
-
Create an assembly file for each user story that you identified.
Follow the conventions for naming anchors and files. For example:
assembly_designing-guided-decision-tables.adoc -
For each top-level assembly file that you created, fill in the content.
For more information, see Assembly Guidelines.
-
Repeat the previous step for each second-level assembly.
C.4. Creating modules
After identifying and creating the assemblies, each assembly should identify the modules that you need to create.
-
For each assembly that you created, create a module file for each module that is identified in the assembly.
Each assembly should already have the names of the modules that should be included in the assembly. Now you just need to create the actual files for those modules.
Follow the conventions for naming anchors and files. For example:
proc_creating-guided-decision-tables.adoc -
For each module file that you created, add content.
Use your existing, feature-based manual to get the content. Make sure to rewrite and rework it to fit the modular documentation module templates. For more information, see:
C.5. Auditing your feature-based manual
In the process of adding content to the modules from your existing feature-based manual, it is likely that there is some existing content that did not fit into any of the user stories that you identified and thus was not pulled out. It is important to identify this content to ensure that it is no longer needed.
-
Go through your existing feature-based manual and identify any content that you did not add to an assembly or module.
-
For each piece of content that you find, determine whether it is necessary.
If the content does not fit into a user story or assembly, then it stands to reason that it may not be necessary to complete any particular user goal. If this is the case, you should be able to discard it.
Example 10. Handling extraneous contentFor example, many feature-based manuals contain detailed sections about how a particular feature works. This type of content, which is valuable in certain contexts, is not always necessary for user documentation — user goals generally involve doing something, not understanding how all the details work. When you encounter this type of content, ask yourself whether a user would need to understand it to accomplish any of their goals (planning, installing, configuring, managing, and so on). If the answer is no, then you can probably discard it.
On the other hand, it is also possible that the content is related to a user story that you have not considered. In that case, you should create the necessary assemblies and modules and add them to your modular doc.