For KIE documentation contributors.
Important update: August 31, 2018
On August 31, 2018, the kie-docs repository that contains KIE community and Red Hat Business Automation documentation was updated substantially to enable shared content between KIE community and Red Hat Business Automation enterprise documentation, to remove obsolete content, and to prepare for an improved content building tool coming soon (Aura).
Summary of KIE/BA documentation changes
Note the following changes that apply to KIE/BA documentation:
- New
kie-docsrepository structure -
The
kie-docsrepository has been restructured to prepare for an improved content building tool coming soon (Aura) and to conform to modular documentation conventions. In the new structure, all assembly folders (enterprise document maps) are consolidated in a singleassembliesdirectory. All.adoccontent files are in a singledoc-contentdirectory. Communitydrools-docs,jbpm-docs, andoptaplanner-wb-es-docsfolders within this directory are in a Maven structure to enable amvn clean install -Dfullbuild. All content files in community folders are or can be used in enterprise assembly builds from theassembliesfolder for the Red Hat Customer Portal. Content files in theenterprise-onlyfolder either apply only to Red Hat Business Automation products or are files that have not yet been reconciled with community content. Each content folder contains sub-directories divided roughly by subject matter.For more details about the new
kie-docsstructure, see Filesystem layout of kie-docs repository. - Centralized
_imagesdirectory -
Going forward, save all new images to only the central
kie-docs/_imagesdirectory instead of in separate sub-directories within the community content folders. Existing images have been moved already, or deleted if unused. Any images that you save outside of that central images folder will not be rendered in the output. - Removed
:imagesdir:declaration in modules -
Going forward, do not specify an
:imagesdir:declaration in any module files or in any KIEindex.adocassembly files. The images directory specification is now configured globally in the KIE community projectpom.xmlsettings, and directs to the centralkie-docs/_imagesdirectory. Only Red Hat Business Automationmain.adocassembly files require an:imagesdir:specification.
Getting the latest KIE/BA repository changes
To get the latest changes made to the kie-docs repository, delete and re-pull the upstream kie-docs master branch.
Do not rebase your existing master branch against kie-docs master branch to get the latest updates. The new master is substantially different so rebasing creates extensive conflicts that, even when resolved, can introduce errors into the new structure.
|
Prerequisites
-
You have access to the
kie-docsrepository in GitHub with your own fork of the repository and a locally cloned copy of yourkie-docsfork. If you have not yet set up yourkie-docsfork or clone, then skip this procedure and see Contributing to the kie-docs repository.
Procedure
-
In your terminal application, navigate to your locally cloned copy of the
kie-docsrepository and switch to a branch other thanmaster. -
Delete the
masterbranch from your local clone, re-pull the newmasterfrom upstreamkie-docs, and force push to your fork:$ cd ~kie-docs $ git checkout <branch-other-than-master> $ git branch -d master $ git fetch --all $ git checkout --track upstream/master $ git push -u $FORKED_REPO_NAME masterReplace $FORKED_REPO_NAME with the remote name of your forked repository; for instructions on setting its remote name, see Fork the kie-docs repository and add remotes.
If you have any active, master-based working branches before this update, create new working branches based on the new
masterbranch and manually apply the updates to the new working branch. -
Continue contributing to
kie-docsdocumentation as described in this document.
1. Introduction
As a KIE developer or technical writer, you can contribute to KIE technical documentation to ensure that product content is as up to date as possible. This document describes the required components and procedures for contributing to KIE documentation and applies to both KIE community and Red Hat Business Automation enterprise content. Differences between community and enterprise content or processes are described explicitly. If you have any questions, contact us.
The following abbreviations are used throughout this guide:
-
KIE: Knowledge Is Everything open-source community group for business management software products, including Drools, jBPM, and OptaPlanner
-
Red Hat Business Automation: Red Hat Business Automation group with software products that correspond with KIE community products, including Red Hat Decision Manager (Drools-based), Red Hat Process Automation Manager (jBPM-based), and Red Hat Business Optimizer (OptaPlanner-based)
-
kie-docs: The KIE/BA documentation repository in GitHub
-
BXMS: Deprecated abbreviation for Red Hat Business Automation software products, still used in some internal Red Hat projects and tools (example: BXMSDOC JIRA Project)
To get started, read the Contributing to the kie-docs repository section.
2. Required documentation tools
To work with the KIE repository, you need the following software:
- Git
-
Git is a version-control system. To install Git on Fedora, CentOS, or RHEL, run the following command (in Fedora, replace
yumwithdnf):# yum install gitOn Windows, Mac OS X, and other Linux distributions, follow the instructions in the official Git documentation.
- Atom (text editor)
-
A text editor that is modern, approachable, yet hackable to the core, and that you can customize to do anything but also use productively without touching a config file. You can use another text editor of your choice, such as gedit, but Atom is recommended for its extensive support of Asciidoctor and many helpful add-on packages.
To install Atom on Fedora, CentOS, or RHEL, go to the Atom homepage from your web browser and click to download the RPM version. Then run the following command (in Fedora, replace
yumwithdnf):# yum install -y atom.x86_64.rpmOn Windows, Mac OS X, and other Linux distributions, follow the instructions in the official Atom documentation.
- Asciidoctor
-
A quick and light tool for local builds that allows you to check factual correctness or flow of information. It does not require any additional packages to be installed, but its output differs visually (and to a very little extent in content[1]) from the final version that is built using Pantheon or ccutil.
To install Asciidoctor on Fedora, CentOS, or RHEL, run the following command (in Fedora, replace
yumwithdnf):# yum install asciidoctorOn Windows, Mac OS X, and other Linux distributions, follow the instructions in the official Asciidoctor documentation.
- Maven 3.5.4 or later (community documentation)
-
A software project management and comprehension tool that can be used to build the community documentation set. To install Maven on Fedora, CentOS, or RHEL, run the following command (in Fedora, replace
yumwithdnf):# yum install mavenOn Windows, Mac OS X, and other Linux distributions, follow the instructions in the official Maven documentation.
- Meld (optional)
-
A graphical tool for comparing files. This tool is useful for comparing Git revisions and resolving merge conflicts.
To install Meld on Fedora, CentOS, or RHEL, run the following command (in Fedora, replace
yumwithdnf):# yum install meld
3. KIE/BA documentation repository
The kie-docs repository in GitHub contains both the community and enterprise sources for KIE/BA documentation. This repository is publicly accessible, but only members of the Red Hat Business Automation development and documentation teams can commit to it.
Previously, the enterprise documentation sources were hosted in an internal GitLab instance. This repository is no longer used for development and does not accept any further code changes.
| To contribute to the repository, follow the instructions in Contributing to the kie-docs repository. |
3.1. Filesystem layout of kie-docs repository
The following is the general structure of the kie-docs repository:
├── _artifacts
├── _images
├── assemblies
    ├── assembly_dmn-models
        ├── dm
            ├── master-docinfo.xml
            └── master.adoc
        ├── drools
        ├── jbpm
        ├── pam
        └── main.adoc
    ├── ...
├── doc-content
    ├── drools-docs
        └── src
            └── main
                └── asciidoc
                    ├── DMN
                        ├──dmn-elements-con.adoc
                        ├── ...
                    ├── ...
    ├── enterprise-only
        ├── installation
            ├──controller-con.adoc
            ├── ...
        ├── ...
    ├── ...
├── ...
└── README.adoc
The following are descriptions of some of the core folders in this repository structure:
-
_artifacts: Directory with document attributes that render according to target output (community, enterprise, or a specific product).
-
_images: Directory with all images used in documentation, divided by relevant sub-directory.
-
assemblies: List of assembly folders used to build content for the Red Hat Customer Portal. Each assembly folder includes a
main.adocassembly file that defines the assembly (document) content, and product-specific build folders (dm,drools,jbpm,pam) that compile the assembly into the rendered output for Red Hat Decision Manager, Drools, jBPM, or Red Hat Process Automation Manager. Each product-specific build folder contains amaster-docinfo.xmlandmaster.adocfiles with metadata required for publishing to the Red Hat Customer Portal.Only the enterprise dmandpamfolders are currently used in production. The communitydroolsandjbpmfolders are preview build folders that are currently not used to build community documents. To build community documents, runmvn clean install -Dfullat thekie-docs,kie-docs/doc-content, orkie-docs/doc-content/$DOC_FOLDER. For more information about building community or enterprise documents, see Building and previewing. -
doc-content: Directory with all
.adoccontent files. Communitydrools-docs,jbpm-docs, andoptaplanner-wb-es-docsfolders are in a Maven structure to enable amvn clean install -Dfullbuild. All content files in community folders are or can be used in enterprise assembly builds from theassembliesfolder for the Red Hat Customer Portal. Content files in theenterprise-onlyfolder either apply only to Red Hat Business Automation products or are files that have not yet been reconciled with community content.
3.2. Branches in kie-docs repository
The branches in the KIE documentation repository consist of a master branch with the latest content, and $VERSION.x.x branches that correlate with KIE community software release versions. Each Red Hat Business Automation software release is based on a designated KIE community software release, but follows a separate sequential version numbering.
The following table lists the KIE/BA repository branches and corresponding KIE community and Red Hat Business Automation software release versions:
| Branch name | Community software version | Enterprise software version | Notes |
|---|---|---|---|
master |
Latest release, plus unreleased updates |
Latest release, plus unreleased updates |
|
7.5.x |
7.5.0.Final |
7.0 (RHDM only) |
Enterprise release of RHDM only, no RHPAM release |
7.7.x |
7.7.0.Final |
7.0 (RHPAM only) |
Enterprise release of RHPAM only, no RHDM release |
7.11.x |
7.11.0.Final |
7.1 |
Combined enterprise release of both RHDM and RHPAM in unison going forward |
7.14.x |
7.14.0.Final |
7.2 |
|
7.18.x |
7.18.0.Final |
7.3 |
|
7.23.x |
7.23.0.Final |
7.4 |
|
7.26.x |
7.26.0.Final |
7.5 |
|
7.30.x |
7.30.0.Final |
7.6 |
4. Contributing to the kie-docs repository
The kie-docs documentation workflow is based on topic branches as described in the the GitHub flow. Using topic branches, you do not commit changes directly to the mainline branch, but instead create a new branch (a topic branch) for every set of related changes (a topic). As an added layer of security, you work in your own fork of the upstream kie-docs GitHub repository, and push changes from a cloned local copy of your fork to your GitHub fork first to avoid introducing bugs upstream. After technical and stylistic reviews of the changes are complete, a team gatekeeper can then test and merge the pull requests into the appropriate upstream kie-docs branches.
The following is a high-level view of the content workflow between the upstream kie-docs GitHub repo, your GitHub fork of the repo, and your locally cloned copy of your fork:
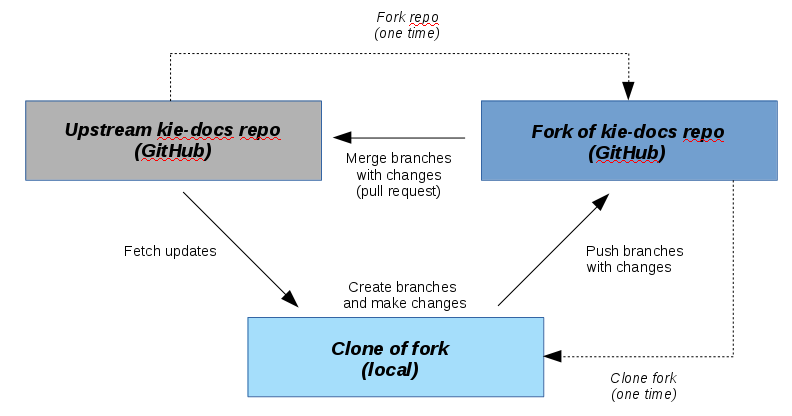
The process for contributing to the kie-docs repository in this workflow consists of the following steps:
4.1. Fork the kie-docs repository and add remotes
You must use your own fork of the kie-docs repository to commit, push, and review changes before merging the changes (in branches) with the main upstream repository. This provides a safe testing ground to minimize problems upstream. When your contribution is finished, it is reviewed and added into the main repository.
Prerequisites
-
Git is installed on your system. For more information, see Required documentation tools.
-
You have a GitHub account.
-
SSH keys have been generated and added to your GitHub account.
Procedure
-
In your browser, navigate to the kie-docs repository. Ensure you are logged in.
-
Click Fork.
If you are a member of a group on GitHub, you can get prompted to specify where to fork the repository. We recommend that you create the fork in your personal space. Wait for the repository to be forked. You will be redirected automatically into your forked repository.
-
In a terminal application, create a directory where you want to work in your forked repository, for example:
$ cd ~/$WORKSPACE $ mkdir $REPOSITORY_NAME #Example: `repos` -
Clone your forked repository:
$ cd ~/$REPOSITORY_NAME
$ git clone git@github.com:$USER_NAME/kie-docs.git
The
$USERNAMEis your GitHub user name. -
In the newly cloned
kie-docsdirectory, add the upstreamkie-docsrepository as an additional remote calledupstreamso that you can pull changes from the upstream to your forked repository:$ git remote add upstream https://github.com/kiegroup/kie-docs.git -
Verify that the upstream remote has been added:
$ git remote -vYou should see
origin(your forked repository) andupstream(upstreamkie-docsrepository).origin git@github.com:sterobin/kie-docs.git (fetch) origin git@github.com:sterobin/kie-docs.git (push) upstream https://github.com/kiegroup/kie-docs.git (fetch) upstream https://github.com/kiegroup/kie-docs.git (push)Consider renaming originyour GitHub user name to avoid confusion with other contributors' forks (also namedoriginby default) when you need to collaborate across forks. To rename your remote, go to thekie-docsrepository in your terminal application and rungit remote rename origin $USERNAME. Please note that going forward, in any Git commands that refer tooriginyou will need to use the new remote name instead (example:git push -u $NEW_NAME $BRANCH_NAME)
4.2. Update your fork branches
Before you begin working on new documentation changes, update the relevant branch in your fork against the upstream kie-docs repository to get the latest changes to that branch. If you do not update your fork branch before making your changes, your branch will be out of date and could result in merge conflicts when you merge.
Procedure
-
In your terminal application, change to the
kie-docsdirectory and fetch latest changes from all remote repositories (your fork, upstream, and any others you have added):$ cd $REPOSITORY_NAME/kie-docs $ git fetch --all -
Check out the branch that will be affected by your changes, rebase it against the upstream version to get the latest changes, and push to your fork.
You must rebase each branch individually against its upstream counterpart in order to get latest changes for that branch. This is important because typically you will need to merge documentation changes in both the masterbranch and the affected release-specific branch (example:7.3.x). For details, see Create a release working branch and cherry-pick the fork pull request.Example 1: Updating fork
masteragainst upstreammaster$ git checkout master $ git rebase upstream/master $ git pushExample 2: Updating fork
7.3.xagainst upstream7.3.x$ git checkout 7.3.x $ git rebase upstream/7.3.x $ git pushThe branch is not listed in my terminal applicationTo bring the branch into your local directory, run
git checkout --track upstream/$BRANCH_NAME. For example, if the branch that you need is7.3.x, then entergit checkout --track upstream/7.3.x. Then push to your fork either for the first time (git push -u origin $BRANCH_NAME) or for an update (git push). You can similarly track a branch from your fork usingorigininstead ofupstream(git checkout --track origin/$BRANCH_NAME), but to ensure that your fork branches are up to date with upstream, always track from upstream and push to your fork.
4.3. Create working branches and make changes in your fork
After you have cloned and set up your forked repository, you can create working branches and make changes that you will commit and push to your GitHub fork before merging upstream.
Create a working branch for every separate task that you are performing on a set of files. Usually, a branch for every JIRA task is appropriate. However, sometimes you need to edit the same source files in several related JIRA tasks. In this case, create one branch for the tasks. If you edit the same files in several branches, merging the changes together can be complicated later and you might encounter issues with the Git workflow.
Prerequisites
-
The upstream
kie-docsrepository has been forked and cloned in a local directory. See Fork the kie-docs repository and add remotes for details. -
The branch that will be impacted by your changes (such as
master) has been updated. See Update your fork branches for details.
Procedure
-
In your terminal application, change to your cloned
kie-docsrepository:$ cd $REPOSITORY_NAME/kie-docs -
Create two working branches: one for you to work in and one to use as the preliminary target branch within your fork to merge working-branch changes. Push these branches into your fork.
Although creating the additional target branch in your fork is not required, it is recommended for cleaner upstream pull requests. See Create a pull request in your fork and assign SME and peer reviews for details. The branches must be based on the master branch into which you want to eventually merge.
The recommended naming format is
$JIRA_ID-$BASE_BRANCH(working branch) and$JIRA_ID-$BASE_BRANCH-final(preliminary target branch).Example: Creating branches for BXMSDOC-1433, based on
master; the remote name for your fork isjoeuser. We create thefinalbranch first because we want the work branch to be checked out when the commands are completed.$ git checkout master $ git branch BXMSDOC-1433-master-final # Target branch that you will merge BXMSDOC-1433-master with when finished and use for SME/peer reviews $ git push -u joeuser BXMSDOC-1433-master-final # create the branch in your fork and push it $ git branch BXMSDOC-1433-master # Working branch where you make changes $ git push -u joeuser BXMSDOC-1433-master # create the branch in your fork and push itNote on master vs. release branchesIf you are making a standard document update that applies to both the
masterand a release branch, such as7.3.x, then later you will also create a release-specific target branch in this same way (example:BXMSDOC-1433-7.3.x-final) and cherry-pick the changes that get merged into themastertarget branch (BXMSDOC-1433-master-final). For details, see Create a release working branch and cherry-pick the fork pull request.However, in the rare case that your document update applies to only a release branch and not to
master, such as a documented known issue for7.3.xthat will be resolved in future releases, then you would follow this same example to create7.3.xworking and target branches only (BXMSDOC-1433-7.3.xandBXMSDOC-1433-7.3.x-final), and nomasterworking branch. -
Navigate to the book and topic that you want to update:
$ cd $REPOSITORY_ROOT/kie-docs/doc-content/$DOC_FOLDER/src/main/asciidocOr, for enterprise-only topics:
$ cd $REPOSITORY_ROOT/kie-docs/doc-content/enterprise-only/$DOC_FOLDERExamples:
-
To modify the community Drools documentation:
$REPOSITORY_ROOT/kie-docs/doc-content/drools-docs/src/main/asciidoc. -
To modify the community shared documentation source:
$REPOSITORY_ROOT/kie-docs/doc-content/shared-kie-docs/src/main/asciidoc. -
To modify enterprise installation topics:
$REPOSITORY_ROOT/kie-docs/doc-content/enterprise-only/installation
The file is usually named the same as the header of the chapter or section it contains.
-
-
Check out your new working branch and open the file in an editor of your choice. To learn about the Atom text editor, see Required documentation tools.
$ git checkout BXMSDOC-1433-master # Working branch that you created for these changes $ atom $FILE_NAME #Opens the file in the Atom text editor, for example -
Make the changes in the file and save your work.
-
Build the book locally using the
mvn clean install -Dfullcommand. For more information about building books, see Building and Previewing. -
Stage, commit, and push your changes to your GitHub fork. You should do this regularly to avoid keeping any work only on your local machine.
$ cd $REPOSITORY_NAME/kie-docs/docs #Recommended to move back "up" in the directory to ensure all modified files are staged and committed.
$ git add --all # Stage all changes, including deleted or renamed files.
$ git status  # review the list of changed files. Do not commit if any unexpected files are in the list
$ git commit -m "BXMSDOC-1433-master Add new section on Guided Decision Tables." #Commit changes with a summary message.
$ git push #Push changes to your GitHub fork.
|
If you see any unexpected files in the list displayed by |
|
If this is your first push to the branch, you can get an error that a remote is not set for this branch. In that case, run Example: Run this command only once. When pushing the next time, run |
Additional resources
-
Filesystem layout of kie-docs repository contains information about the repository structure and where to find particular files.
4.4. Create a pull request in your fork and assign SME and peer reviews
Before you create a pull request for upstream merging, consider creating an initial pull request in your fork first to merge your working branch with your preliminary target branch, for which an SME and peer can validate changes before you merge upstream. Although this initial in-fork pull request is not required, it creates a cleaner upstream pull request later and enables you to resolve potential merge conflicts before you create the upstream pull request.
If you choose to skip the in-fork pull request, your SME and peer reviews must be based on the upstream pull request, and you will need to cherry-pick changes from the final (SME and peer approved) upstream master pull request onto the release branch, if applicable.
|
Prerequisite
-
Your working and target branches have been created in your fork, and the working branch has been updated with changes. See Create working branches and make changes in your fork for details.
Procedure
-
In a web browser, go to your GitHub account and navigate to your personal fork of the
kie-docsrepository.Use only your fork for these steps, not the central kie-docsrepository. -
In the Pull requests tab, click New pull request and create a pull request for the working branch in your fork to be merged with the preliminary target branch in your fork that you created.
-
base fork:Your own fork ($USER/kie-docs) -
base:The preliminary target branch that the working branch will be merged with (BXMSDOC-1433-master-final) -
head fork:Your own fork -
compare:The working branch containing the changes to be merged (BXMSDOC-1433-master)
 Figure 2. Example pull request
After you select to compare within your own fork, the base fork selection disappears. If you need to restore the fork selections for whatever reason, click compare across forks in the description above the forking options. -
-
In the pull request, add links to any needed documentation resources, such as a related JIRA or a shared public directory with the rendered document preview.
-
To make changes for SME and peer review results, change files and commit them as described in Create working branches and make changes in your fork. The pull request is automatically updated as soon as you push a commit to your fork.
4.5. Merge the pull request in your fork and rebase the final branch
After SME and peer reviews are complete, you must merge the pull request in your fork. You do not need the gatekeeper to accept this first pull request in your fork. The gatekeeper only merges upstream pull requests, which come next.
After merging the pull request, you must rebase the final branch on the current upstream master branch in order to resolve any conflicts before merging upstream.
Prerequisites
-
The pull request from your working branch to your target (final) branch has been created. See Create a pull request in your fork and assign SME and peer reviews for details.
-
You have made all necessary changes and pushed them to your working branch.
|
In this example, you are developing documentation under the |
Procedure
-
In a web browser, access the in-fork pull request (from
BXMSDOC-1433-masterintoBXMSDOC-1433-master-final). -
Scroll down to the green merge button, click the drop-down arrow on the button, and select Squash and merge. This action merges all your changes into the final branch as a single commit; a commit that contains the contents from multiple commits, like the one in this case, is called a squashed commit.
-
Check out the local
BXMSDOC-1433-master-finalbranch and pull latest changes from your fork:$ git checkout BXMSDOC-1433-master-final $ git pull --rebaseThis step is necessary for two reasons:
-
Populates your local copy of the
BXMSDOC-1433-master-finalbranch with the latest squashed commit that you will need to cherry-pick onto the release working branch. For details about cherry-picking, see Create a release working branch and cherry-pick the fork pull request. -
Enables you to rebuild the output locally to ensure that the updated branch builds successfully. For details about building locally, see Building and Previewing.
-
-
In your terminal application, fetch the latest upstream changes and rebase your newly merged
BXMSDOC-1433-master-finalbranch on upstream master:$ git fetch --all $ git checkout BXMSDOC-1433-master-final $ git rebase upstream/master -
Check the command-line output to see if any conflicts are reported.
If no conflicts are reported, force-push the branch into your fork:
$ git push --forceDo not run
git pull --rebase, as git prompts you to do.If conflicts are reported and Meld is installed, see Resolving merge conflicts using Meld.
If conflicts are reported and Meld is not installed, run
git statusto view the conflicting files and, in your text editor, open and edit every file for which the conflict is reported. The conflicting parts are highlighted in your text editor as follows:If you have questions, please <<<<<<< HEAD open an issue ======= ask your question in IRC. >>>>>>> branch-aDecide which version should be in the final branch and delete the other version, as well as the markup (
===<<<>>>lines). If you are using the Atom editor, you can see the changes highlighted in different colors and Use me buttons are available for each possible version; click the Use me button for the version that you want to keep and the editor removed the markup automatically.You can also make other changes in the files as necessary (for example, to make the merged version fit logically).
Make sure to scroll through the entire "conflicted" file for any other conflicts, and make sure that every "conflicted" file is in final form.
You can use full-text search to check in which files you still need to resolve conflicts. Open the entire tree in the Atom editor and use the Find > Find in Project menu option to search for >>>>.Edit and save all files where conflicts are present. Then
git addthe files and continue the rebase:$ git add --all $ git rebase --continueIf new conflicts are reported, repeat the same steps for any conflicting files. However, if you used the squashing procedure correctly, git normally reports only one set of conflicts, as only one commit is applied.
-
When no more conflicts are reported for the rebase, force-push the branch into your fork:
$ git push --force
4.6. Create a release working branch and cherry-pick the fork pull request
|
Before you begin, please note:
|
The newly updated master-based branch in your fork (BXMSDOC-1433-master-final) can now be merged to upstream master, but it cannot be merged into the relevant release-specific branch, such as 7.3.x. To be able to merge the new changes into 7.3.x, you must first create a second working branch based on 7.3.x and cherry-pick the changes merged in BXMSDOC-1433-master-final.
For the list of active KIE/BA repository branches and corresponding community and enterprise release versions, see Branches in kie-docs repository.
Prerequisites
-
SME and peer have approved your changes, your
masterworking branch (BXMSDOC-1433-master) has been merged with the target branch (BXMSDOC-1433-master-final) in your fork, and your local target branch has been updated and rebased. See Merge the pull request in your fork and rebase the final branch for details.If you do not update this local target branch, then when you try to cherry-pick the relevant commit or commits, one of the following errors can appear:
fatal: bad object
or
fatal: bad revision
Procedure
-
In your terminal application, change to your
kie-docsfork and update the7.3.xbranch:$ git fetch --all $ git checkout 7.3.x # If the branch is not listed locally, use git checkout --track upstream/7.3.x $ git rebase upstream/7.3.x $ git push # If pushing for the first time, git push -u origin 7.3.xFor details, see Update your fork branches.
-
Create a
7.3.xtarget branch and push to your fork:$ git checkout 7.3.x $ git checkout -b BXMSDOC-1433-7.3.x-final # New target branch that will cherry-pick BXMSDOC-1433-master-final $ git push -u origin BXMSDOC-1433-7.3.x-final #First-time push only. Next time use `git push`.For details, see Create working branches and make changes in your fork.
-
In a web browser, go to your GitHub account and navigate to your personal fork of the
kie-docsrepository. -
Select the
mastertarget branch that you previously merged (BXMSDOC-1433-master-final) and select Commits. -
Find the squashed commit in the commit history that corresponds to your pull request; normally this is the top commit. Copy or note the commit hash (7-digit commit number). You can also click the Copy the full SHA clipboard icon to copy the full commit hash.
If you did not use Squash and merge to merge your changes, the changes might be present as several commits, not one commit. For the procedure to cherry-pick them, see Cherry-picking a range of commits -
In your terminal application, ensure that you are in your newly created
7.3.xtarget branch (BXMSDOC-1433-7.3.x-final) and rungit cherry-pick $COMMIT_HASHto cherry-pick the copied pull request:$ git checkout BXMSDOC-1433-7.3.x-final $ git cherry-pick 971aee7 $ git pushIf the
git cherry-pick $COMMIT_HASHcommand displays an error message, trygit cherry-pick $COMMIT_HASH -m 1. -
Build the cherry-picked target branch (
BXMSDOC-1433-7.3.x-final) locally to ensure that the changes frommasterwere incorporated properly.
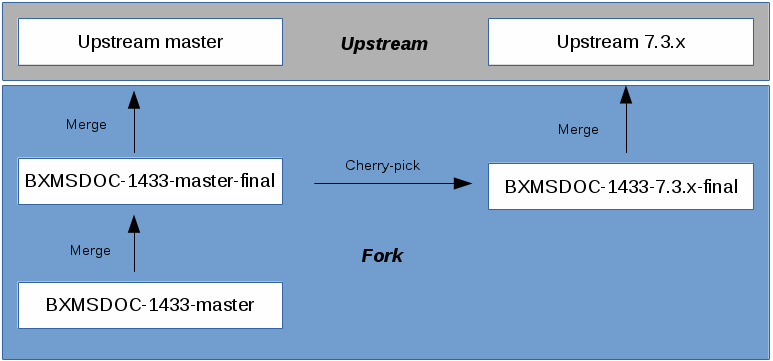
The 7.3.x target branch and the master target branch are now ready for upstream merging.
Below is a visual overview of the merging and cherry-picking process:
4.6.1. Cherry-picking a range of commits
If you did not use Squash and merge to merge your changes into the final branch, the changes might be present in the final branch as a range of commits. Also, in some cases, you might want to cherry-pick a range of commits from the working branch instead of the complete set of changes.
Avoid such operations if possible, as there is a greater risk of merge conflicts or other Git issues.
Consider the following example commit history in the working branch in GitHub:
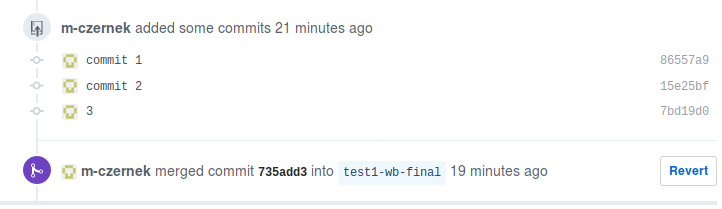
In the final branch, these commits are "squashed" into a single commit. So you can cherry-pick either the whole set of changes, as described in this section, or a range of specified commits (all commits if needed):
-
Cherry-pick whole pull request:
git cherry-pick 735add3 -
Cherry-pick range of commits:
git cherry-pick 86557a9^..7bd19d0
When cherry-picking a range of commits, always use the format $OLDEST_COMMIT^..$LATEST_COMMIT, as shown.
After completing the cherry-picking, push the new branch with git push.
Additional resources
4.7. Create upstream pull requests
After all reviews are complete and your master and release target branches in your fork (BXMSDOC-1433-master-final and BXMSDOC-1433-7.3.x-final) are ready to be merged upstream, you create an upstream pull request for each branch: one for upstream master and one for upstream 7.3.x.
Prerequisites
-
Your
masterworking branch (BXMSDOC-1433-master) has been approved by the SME and peer reviewers and merged with the preliminary target branch in your fork (BXMSDOC-1433-master-final). See Merge the pull request in your fork and rebase the final branch for details. -
You have created a target branch based on the relevant release (
BXMSDOC-1433-7.3.x-final) and have cherry-picked the changes from themastertarget branch (BXMSDOC-1433-master-final) onto it in your fork. See Create a release working branch and cherry-pick the fork pull request for details.
Procedure
-
In a web browser, go to your GitHub account and navigate to your personal fork of the
kie-docsrepository. -
Create two separate pull requests, one for each target branch in your fork to be merged upstream.
For the upstream
masterpull request:-
base fork:The centralkie-docsrepository (kie-group/kie-docs) -
base:The upstreammasterbranch -
head fork:Your own fork ($USER/kie-docs) -
compare:The target branch formastercontaining the changes to be merged upstream (BXMSDOC-1433-master-final)
 Figure 4. Example pull request for upstream master
For the upstream
7.3.xpull request:-
base fork:The centralkie-docsrepository (kie-group/kie-docs) -
base:The upstream7.3.xbranch -
head fork:Your own fork ($USER/kie-docs) -
compare:The target branch for7.3.xcontaining the cherry-picked changes to be merged upstream (BXMSDOC-1433-7.3.x-final)
 Figure 5. Example pull request for upstream 7.3.x
 -
-
In the pull request, add links to any needed documentation resources, such as a related JIRA or a shared public directory with the rendered document preview.
-
Notify the gatekeeper that the pull request is ready to be reviewed and merged.
Once all of the above steps are complete, the gatekeeper will confirm that the required reviews are present and that the checks passed for the automated build.
If any merge conflicts or other build problems arise, the gatekeeper will contact you to resolve them.
After all issues are resolved, the gatekeeper will merge the pull request.
5. Cherry-picking changes between branches
If you are working in multiple branches—for example when fixing an issue that is present in multiple versions of the documents—the most efficient way to make the same change in all relevant branches is to make it in one branch, commit it, and cherry-pick it into the other branches using Git.
If the differences between the versions (across branches) of the same document are minimal, the cherry-pick will likely apply cleanly, meaning you save a lot of work as opposed to making the change again manually. However, if the versions are very different, we recommend making the changes by hand. As a general recommendation, try to cherry-pick the commit first. If the cherry-picking fails (that is, you get too many merge conflicts), make the changes in all the branches by hand.
Prerequisites
-
More than one branch where changes should be applied.
-
One or more commits with the changes, applied in one of the relevant branches.
Procedure
-
In a terminal application, navigate to the repository.
-
Check out the branch with the changes already applied:
Example:
$ git checkout BXMSDOC-474 -
Display the Git log, identify the commits that you want to apply to other branches, and copy their hashsums:
$ git log --sparse --onelineExample output:
4b5a575 Finish JS API and move it to Dev Guide
e1c8dc3 BXMSDOC-474 - peer review of the changes
e347769 BXMSDOC-474: Task List example
ad2390e BXMSDOC-474: Changed variable name for consistency
...
The newest commits are displayed on top. In this example,
4b5a575,e1c8dc3,e347769, andad2390eare hashsums. For demonstration purposes, we will cherry-pick the latest two commits, which means the hashsumse1c8dc3and4b5a575(newest commits are displayed on top). -
Check out the branch you want to apply the changes to:
Example:
$ git checkout BXMSDOC-474-6.3 -
Apply the desired changes using Git’s
cherry-pickcommand:Example:
$ git cherry-pick e1c8dc3 4b5a575You must apply the changes from oldest to newest, otherwise you can get merge conflicts. If you get merge conflicts, resolve them. For more information, see Resolving merge conflicts using Meld.
-
Push the changes.
$ git push
6. Resolving merge conflicts using Meld
When you try to apply a change to a Git branch, for example while cherry-picking, rebasing, or merging, the branch or commit can contain changes that are incompatible with the existing content. You can use Meld to view the conflicting content in the files you are trying to merge and then select the version of the content you want to keep. This resolves the conflict so that you can merge.
| You can resolve merge conflicts without Meld (Git is configured to use a fallback tool in such a case), but this section focuses on Meld because it is comparatively powerful and easy to use. |
Prerequisites
-
Meld. For more information, see Required documentation tools.
Procedure
-
In a terminal application, navigate to the repository and run:
$ git mergetoolGit can ask if you want to run Meld to resolve the conflicts. If so, press Enter. When resolving a merge conflict, Meld displays three columns that show the same file in three states (in this order, from the left):
- Local (file name that contains "LOCAL")
-
The file as is currently committed in the mainline branch.
- Result (unchanged file name)
-
What the file will look like after you apply the changes you are trying to cherry-pick.
- Remote (file name that contains "REMOTE")
-
The changes you are trying to apply.
It is recommended to first click Changes → Merge all before working on the conflicting areas to apply all non-problematic changes. However, Meld can occasionally interpret the changes wrongly, so always verify that this step did not introduce any errors. If it did, click View → Refresh to undo the step and merge the changes manually instead. -
Scroll through the file to look for conflicts, which are highlighted in red.
-
Merge the changes either from Local or Remote to the Result column in the middle by clicking the right arrows (Local) or left arrows (Remote).
Alternatively, you can directly modify the contents of the middle column (Result) in case the changes in question are complicated, and merging all of the red area from one of the columns would yield wrong results.
-
When you have finished merging changes, select the middle column, click Save, and close Meld.
-
Repeat the steps above for all files with merge conflicts.
-
After you resolve all merge conflicts, add the affected files to stage:
$ git add AFFECTED_FILE_1 AFFECTED_FILE_2 ... -
Continue the process that caused the merge conflict (perform only the action that applies in your situation):
- Merging
-
$ git commit - Rebasing
-
$ git rebase --continue - Cherry-picking
-
$ git cherry-pick --continue
Additional resources
-
GitHub guide on resolving merge conflicts using command line.
7. Building and previewing
7.1. Building KIE community documents locally
Community documents are found in the drools-docs, jbpm-docs, and optaplanner-wb-es-docs folders in kie-docs/doc-content. These folders are in a Maven structure, so you can build them using the mvn clean install -Dfull command.
Before pushing community content changes to the kie-docs repository, always build KIE documents locally first using Maven to check how the book renders in Asciidoc with your changes.
If you have reused (single-sourced) modules between KIE community and Red Hat Business Automation documents, you must build both the enterprise assembly and the community document locally before pushing to kie-docs. For information about building enterprise documents, see [task_build-assemblies-locally].
|
Prerequisite
Maven 3.5.4 or later is installed. For more information, see Required documentation tools.
Procedure
In a terminal application, navigate to the kie-docs repository, run a Maven build to build all community documents, and open the rendered Asciidoc output to verify your changes.
$ cd ~kie-docs
$ mvn clean install -Dfull
$ google-chrome doc-content/drools-docs/target/generated-docs/html_single/index.html
Replace google-chrome with a browser of your choice. Replace drools-docs with the community doc that you want to verify.
|
8. JIRA issue tracking
The issues with the product documentation are hosted on JBoss JIRA, an issue tracking system used by multiple Red Hat JBoss Middleware products. Software-related issues are hosted on JIRA as well. For detailed instructions on how to create a product documentation (BXMSDOC) task in JIRA, see the BxMS documentation Mojo page.
BXMS is a deprecated abbreviation for Red Hat Business Automation software products, still used in some internal Red Hat projects and tools, such as JIRA.
|
The product uses several JIRA projects to track the issues:
| Project | Description |
|---|---|
Issues, plans, and tasks for the BPM Suite, BRMS, and Business Resource Planner documentation. |
|
Issues with the BRMS software. These issues often require changes in documentation, so they are typically linked to BXMSDOC issues that track how the features are documented. |
|
Issues with the BPM Suite software. These issues often require a change in the documentation, so they are typically linked to BXMSDOC issues that track how the features are documented. |
|
Issues with the Drools software. |
|
Issues with the jBPM software. |
|
Issues with the OptaPlanner (Business Optimizer) software. |
|
Issues with the Workbench/Business Central software. |
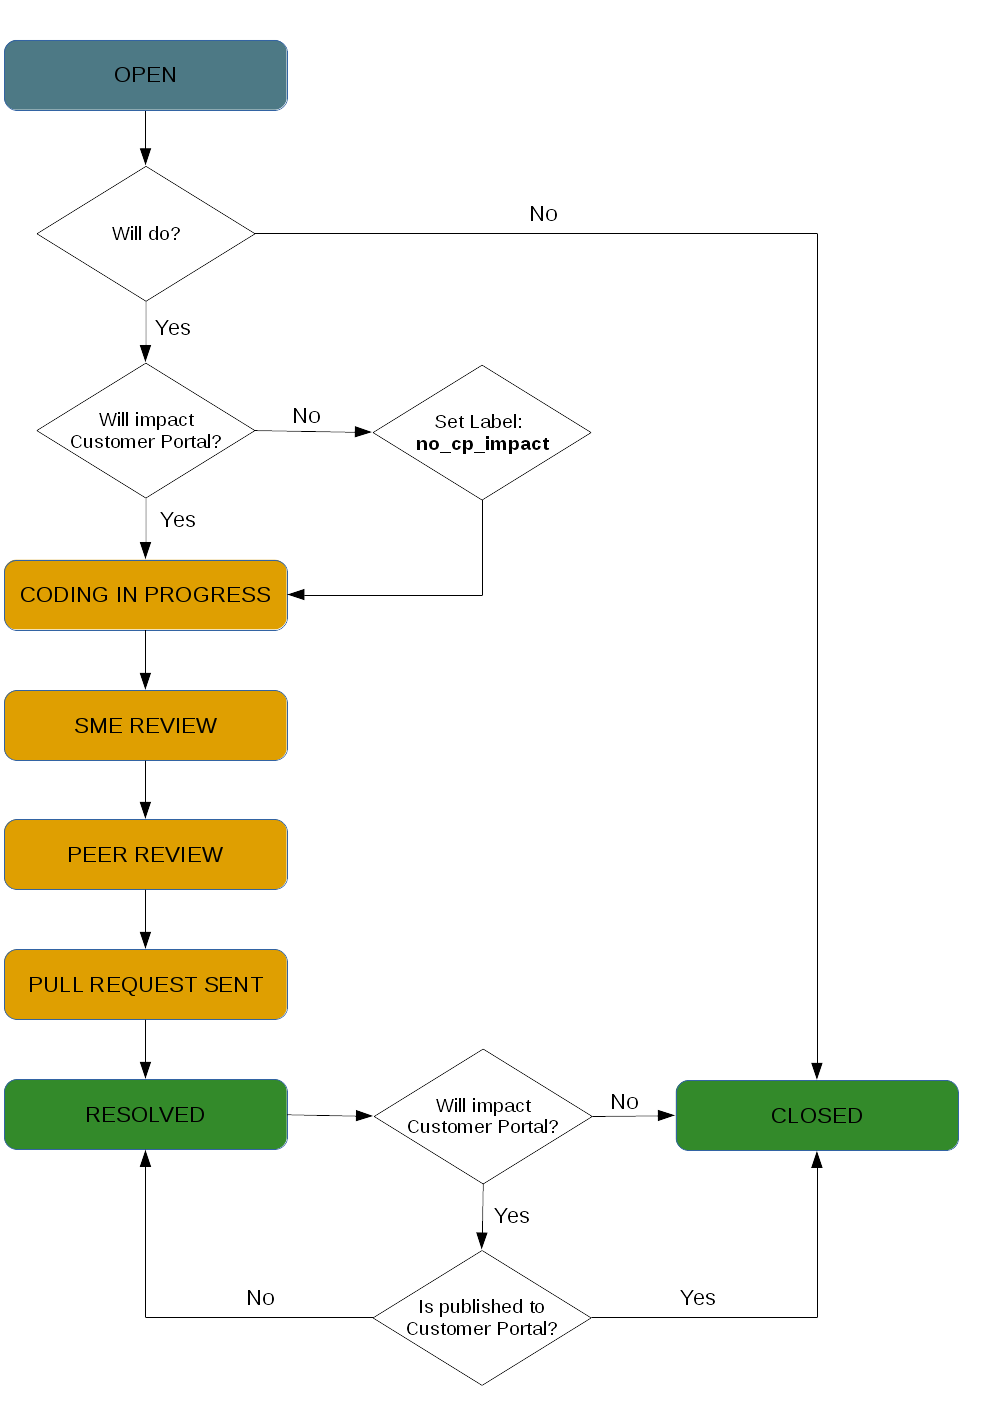
8.1. BXMSDOC issue life cycle
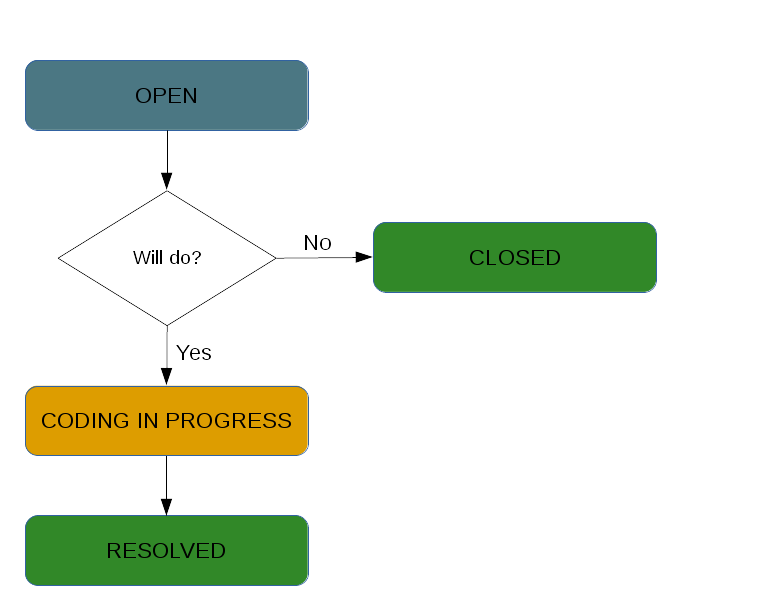
During its standard life cycle, an issue in the documentation JIRA project (BXMSDOC) goes through the following statuses. Details are provided in the BXMSDOC JIRA Status Descriptions.
8.1.1. BXMSDOC JIRA Status Descriptions
- Open
-
Every filed issue starts in the Open status. This status means no one is actively working on the issue, and no progress is being done.
|
Set Label for Non-Portal Updates
If a document update will not affect the Red Hat Customer Portal, such as an update to a community document, then set the JIRA Label to |
- Coding in Progress
-
The assignee is working on the issue, and no draft is available for review at the moment. The issue can also be blocked because the writer has requested information from an SME that is essential for finishing the draft. Look in the comment section of the issue for details.
- SME Review
-
The assignee has finished a draft of the issue, has created a sub-task called SME Review: $NAME_OF_ISSUE, and has assigned the sub-task to a developer or a QE engineer (subject matter expert) to review the content for technical accuracy.
- Peer Review
-
The SME has approved of the draft and has resolved the relevant SME Review sub-task. The assignee has created a sub-task called Peer Review: $NAME_OF_ISSUE and has assigned it to a CCS associate (a peer) to review the content for compliance to writing style, naming conventions, corporate requirements, and more.
- Pull Request Sent
-
The Peer has approved the draft and has resolved the relevant Peer Review sub-task. The assignee has notified the gatekeeper that the pull request has been reviewed and approved by all reviewers, and is ready to be merged with the specified mainline branch in the
kie-docsrepository. - Resolved
-
The updated topic branch was merged into the relevant mainline branch in the upstream
kie-docsrepository, and is pending publication on the Customer Portal. If the update does not affect the Customer Portal, and the Label has been set tono_cp_impact, then you can skip this status and set the issue toCLOSED > DONE. - Closed (reason)
-
Use the
CLOSEDstatus and reason as follows:-
For Customer Portal updates: When the resolved issue has been published to the Customer Portal, set the status and reason to
CLOSED > DONE. Until publication in the Portal, the update must remainRESOLVED. -
For non-Portal updates: When the resolved issue has been merged upstream, or if not an upstream change, has been approved and otherwise made available, set the status to
CLOSED > DONE. -
For issues that will not be fixed: Set the status to
CLOSEDand give a reason for not completing the issue (Won’t Do,Duplicate,Rejected, or other).
-
8.2. Review status life cycle
The review sub-tasks (SME review, peer review, QE review) go through the following statuses. Details are provided in the Review status descriptions.
8.2.1. Review status descriptions
- Open
-
The reviewer is not working on the issue, and no progress is being made.
- Coding in Progress
-
The reviewer is looking at the draft or has provided feedback. The issue stays in Coding in Progress until the writer makes all the necessary changes.
- Resolved
-
The review has concluded, and the draft is correct from the reviewer’s perspective.
- Closed (reason)
-
The review was stopped because the parent JIRA was closed or the review JIRA is otherwise obsolete. Set the reason for closing accordingly (
Won’t Do,Duplicate,Rejected, or other).
8.3. Addressing a JIRA issue
As you plan and execute your JIRA work in a sprint, ensure that you address JIRA issues in a way that tracks your work completely and efficiently.
Prerequisite
You have an account on JBoss JIRA with proper permissions.
Procedure
-
Ensure that you are logged in to JIRA.
-
Select the issue that you want to address.
-
Click the Assign to me link next to the Assignee field if the issue is not already assigned to you.
If the issue is assigned to someone else, consult them first before taking their issues. -
Set the issue’s status to
IN PROGRESSby clicking the In Progress button at the top of the page. -
If the issue involves modifying the documentation set, create a draft and make the needed changes. For details, see Contributing to the kie-docs repository.
-
If you created a pull request, link it to the issue by clicking Edit and putting the URL of the pull request in the Git Pull Request field.
-
Have the issue reviewed by an SME:
In the case of SME reviews, it must always be a QE engineer performing the review. -
Find a suitable SME to do the review. See Contact information if you are unsure whom to contact.
-
Create a sub-task to track the progress of the SME review, and assign it to the reviewer:
-
Click More → Create sub-task.
-
Fill in
SME
Review: $NAME_OF_ISSUE
in the Summary, where$NAME_OF_ISSUEis the name of the parent issue. -
Fill in a description of what you want the assignee to review, or point to the pull request.
-
-
Set the parent issue’s status to
SME REVIEW. -
Incorporate the feedback from the reviewer.
-
Ensure the review sub-task is marked as
RESOLVED.
-
-
Have the issue reviewed by a peer:
-
Find a suitable CCS associate to do the review. See Contact information if you are unsure whom to contact.
-
Create a sub-task to track the progress of the peer review, and assign it to the reviewer:
-
Click More → Create sub-task.
-
Fill in
Peer
Review: $NAME_OF_ISSUE
in the Summary, where$NAME_OF_ISSUEis the name of the parent issue. -
Fill in a description of what you want the assignee to review, or point to the pull request.
-
-
Set the parent issue’s status to
PEER REVIEW. -
Incorporate the feedback from the reviewer.
-
Ensure the review sub-task is marked as
RESOLVED.
-
-
Ensure all pull requests related to the current issue are merged.
-
If there are engineering issues (most likely from the
RHPAM,RHDM, orBAPLprojects) linked to the current issue, add a comment into each of them saying that the documentation was updated.Example:
Documentation was updated. For more information, see BXMSDOC-$ID.In the example above,
$IDstands for the issue ID. -
Mark the current issue as
RESOLVED.
Additional resources
9. GitHub pull request reviews
GitHub is not used for tracking issues or development progress of the documentation, only for managing pull requests. To report an issue, use JIRA.
Each pull request is subject to the same review from the Engineering team, and from the CCS Gatekeeper or a writer.
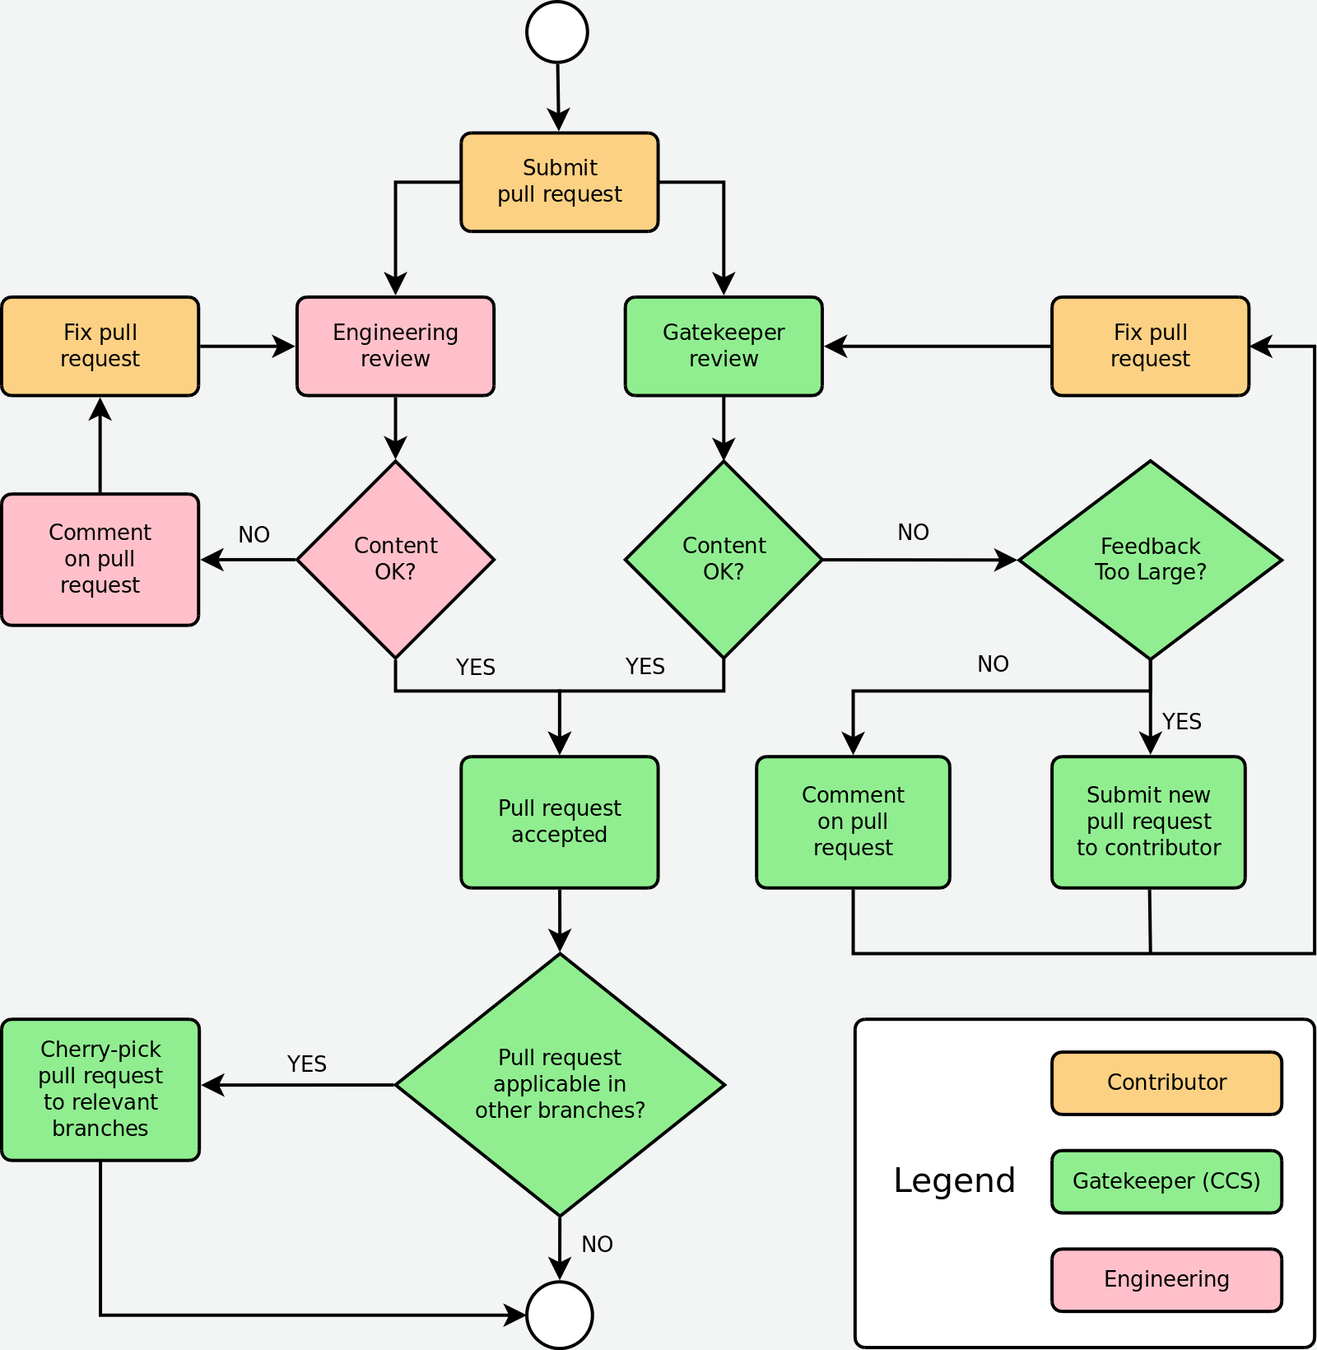
| A writer can be appointed to perform tasks marked "Gatekeeper," especially in situations when too many contributions must be reviewed in a short time frame. |
10. Modular documentation conventions
Modular documentation is documentation based on modules, which are reusable building blocks of information with a well-organized structure. The primary types of modules are concept, reference, and procedure modules. Technical writers write modules separately based on module type, and then combine the modules into assemblies. The assembly of modules, often preceded by an introduction, is then generated as a user-story-based document.
Creating documentation in this way makes content reusable, consistent, and well structured, enabling a large body of contributors to work more efficiently to build clear, reliable documentation for end users.
For details about how to create content modules and assemblies, see the Modular Documentation Reference Guide.
10.1. File names and anchor names
To optimize modular documentation, follow these guidelines for naming module files and anchors:
- File names
-
Give an informative name separated by dashes and indicate the module type (
confor concept,reffor reference,procfor procedure) at the end of the name. If applicable, consider also providing a module sub-type (such ascreate,edit,delete) right before the module type. Indicating the module type and sub-type at the end of the file name instead of the beginning of the file name results in topics being sorted based on subject matter rather than module type. This assortment can be helpful for managing related content.For assemblies, however, precede the file name with
assembly_. This sets assembled content apart from the content modules.Examples-
guided-decision-tables-con.adoc(Concept module) -
guided-decision-tables-create-proc.adoc(Procedure module for creating) -
guided-decision-tables-edit-proc.adoc(Procedure module for editing) -
guided-decision-tables-examples-ref.adoc(Reference module with examples) -
guided-decision-tables-limitations-ref.adoc(Reference module with limitations) -
assembly_guided-decision-tables.adoc(Assembly of guided decision table modules)
-
- Anchor names
-
Provide an anchor using the module file name in the format
[id='file-name']for every module so that it can be identified by Asciidoctor when reused or cross-referenced. Ensure that the anchor name is the file name. Do not name the anchor the same as the module heading. Matching the anchor name to the file name, in the format described in this document, instead of to the module heading provides greater stability for files and anchors as module headings change over time.[id='file-name'] = Module or assembly heading First sentence of module, or purpose statement of assembly.Example 1. Concept module[id='guided-decision-tables-con'] = Guided decision tables The guided decision tables feature works similarly to ...Example 2. Procedure module[id='guided-decision-tables-create-proc'] = Creating guided decision tables You can use guided decision tables to ...Example 3. Assembly[id='assembly_guided-decision-tables'] = Designing a decision service using guided decision tables As a business analyst, you can ... include::.../guided-decision-tables-con.adoc include::.../guided-decision-tables-create-proc.adoc ...
|
Note on other anchor formats (not recommended)
The format defined here is recommended because it is the most stable and versatile of anchor formats, and supports document attribute variables that enable topics to be reused and cross-referenced properly. For details, see Reusing modules in assemblies. Other anchor formats include |
For more information about Asciidoc anchors, see the Asciidoctor User Manual.
10.2. Reusing modules in assemblies
When you create content in modules, you can use the same module multiple times in an assembly without having to replicate information in multiple source files. However, in order to facilitate module reuse, you must embed a document attribute variable in the anchor name for the module and then define that variable in the assembly each time the reused module appears. If the variable is not embedded and assigned, an error appears at build time reporting the duplicated anchor ID.
ID "$ANCHOR_NAME" is duplicated in the source content
$BUILD_PATH fails to validate
This error is resolved by adding and defining a document variable.
Procedure
-
In the module file that will be reused, add the
{context}suffix with an underscore to the anchor name in the format[id='anchor-name_{context}'].Although you can use any document variable that clearly indicates the variable in question, such as {product}or{chapter}, the{context}variable is recommended. This variable indicates more generally that the same module can be reused in the specified "context" of one section of a document or another, regardless of whether that section is product-specific or not, whether it is a whole chapter or a small assembly, or some other limitation.Two modules to be reused: Module A and Module B[id='module-A-being-reused_{context}'] = Module A heading[id='module-B-being-reused_{context}'] = Module B heading -
In the assembly file or the master book file, define the
:context:variable, separated by dashes, in the format:context: variable-name. Where in the assembly you place the:context:variable and how you define it depends on whether a module is included once in multiple assemblies, or is included multiple times in a single assembly.- Module included once in multiple assemblies
-
If the reused modules are included only once in this assembly and in at least one other assembly, define an assembly-level variable in the format
:context: assembly-nameand place it immediately following the assembly heading. This indicates that any reused modules in the entire assembly are appearing in the context of that assembly.In the examples below, the reused modules are identified with an asterisk (*). Do not use asterisks in your own assemblies.
Assembly 1[id='assembly_name-of-assembly-1'] = Assembly 1 heading :context: assembly-1-name ... include::some-module-not-being-reused.adoc *include::module-A-being-reused.adoc include::some-module-not-being-reused.adoc *include::module-B-being-reused.adoc ...Assembly 2[id='assembly_name-of-assembly-2'] = Assembly 2 heading :context: assembly-2-name ... include::some-module-not-being-reused.adoc *include::module-A-being-reused.adoc include::some-module-not-being-reused.adoc *include::module-B-being-reused.adoc ... - Module included multiple times in a single assembly
-
If a module is included multiple times in the same assembly, define a variable specific to a section or a chapter of that assembly in the format
:context: section-name, and place it immediately above the included section for which it specifies the context. This indicates that the reused module is appearing in the context of that section of the assembly.In the examples below, the reused modules are identified with an asterisk (*). Do not use asterisks in your own assemblies.
Assembly[id='assembly_name-of-assembly'] = Assembly heading ... include::some-module-not-being-reused.adoc :context: section-1-name *include::module-A-being-reused.adoc include::some-module-not-being-reused.adoc :context: section-2-name *include::module-A-being-reused.adoc ...
-
Return to the reused module file, and at the top of the file add a comment that identifies which assemblies the module has been added to. This helps to track reused modules in the future.
// Module included in the following assemblies:
//
// assembly_name-of-assembly-1.adoc
// assembly_name-of-assembly-2.adoc

[id='module-A-being-reused_{context}']
= Module A heading
|
Cross-referencing reused modules
To cross-reference a reused module, specify both the anchor name and the Example: |
Practical example 1: Reusing modules in multiple assemblies
You want to reuse the "Creating Assets" procedure module and the "Projects" concept module in two assemblies: in an "Asset Definitions" assembly and in a "Business Rules" assembly.
The module files contain the following content:
// Module included in the following assemblies:
//
// assembly_asset-definitions.adoc
// assembly_business-rules.adoc

[id='projects-con_{context}']
= Projects// Module included in the following assemblies:
//
// assembly_asset-definitions.adoc
// assembly_business-rules.adoc
[id='assets-create-proc_{context}']
= Creating assetsThe assembly files contain the following content. The reused modules are identified with an asterisk (*). Do not use asterisks in your own assemblies.
[id='assembly_asset-definitions']
= Asset definitions
:context: asset-definitions
...

include::.../organizational-units-con.adoc

include::.../repositories-con.adoc

*include::.../projects-con.adoc

include::.../organizational-units-con.adoc

include::.../packages-create-proc.adoc

*include::.../assets-create-proc.adoc

include::.../dependencies-add-proc.adoc

...[id='assembly_business-rules']
= Business rules
:context: business-rules
...
include::.../business-processes-con.adoc
*include::.../projects-con.adoc
include::.../project-types-ref.adoc
include::.../packages-con.adoc
*include::.../assets-create-proc.adoc
...For all cross-references to the reused modules, specify which context (assembly) you want to link to. For example, you can link to the "Creating Assets" procedure module as it appears either in the "Asset Definitions" assembly or in the "Business Rules" assembly. Create cross-references in the format xref:anchor-name_context-variable-name[]:
For details, see xref:assets-create-proc_asset-definitions[].or
For details, see xref:assets-create-proc_business-rules[].Practical example 2: Reusing a module in a single assembly
You want to reuse the "Projects" concept module twice in the "Business Rules" assembly.
The module file contains the following content:
[id='projects-con_{context}']
= Projects
The assembly file contains the following content. The reused modules are identified with an asterisk (*). Do not use asterisks in your own assemblies.
[id='assembly_business-rules']
= Business rules
...

:context: introduction
*include::.../projects-con.adoc

include::.../organizational-units-con.adoc

include::.../asset-types-ref.adoc

:context: asset-types
*include::.../projects-con.adoc

include::.../dependencies-con.adoc

...
For all cross-references to the reused module, specify which context (section) you want to link to. For example, you can link to the "Projects" module as it appears either in the "Introduction" or in the "Asset Types" section. Create cross-references in the format xref:anchor-name_context-variable-name[]:
For details, see xref:projects-con_introduction[].or
For details, see xref:projects-con_asset-types[].10.2.1. Reusing modules between KIE community and Red Hat Business Automation documents
You can direct include statements in Red Hat Business Automation assemblies to .adoc source files in KIE community content folders (such as drools-docs and jbpm-docs). This enables single sourcing between community and enterprise documents, where community contains the single source that you can update and consolidate for both community and enterprise use. Single-sourcing prevents content duplication and creates a cleaner, more efficient, and more up-to-date documentation project.
| When you reuse modules between community and enterprise documents, ensure that all relevant document attributes and conditional elements are correctly applied so that the content renders properly in both community and enterprise outputs. |
Prerequisites
-
You have reviewed the concepts and tasks described in Reusing modules in assemblies.
-
You have access to the
proposal-drepository (containing the requiredba-buildscript) in GitLab, and a locally cloned copy ofproposal-d. For more information, see theREADMEfile of theproposal-drepository. -
You have updated your locally cloned
proposal-drepository (git pull --rebase) to ensure that you have the latestba-buildscript.
Procedure
-
Ensure that the modules that you want to reuse and the assemblies that will direct to them contain the anchor, file, and
contextrequirements for single-sourcing, as described Reusing modules in assemblies. -
Identify the modules that you want to reuse in both a Red Hat Business Automation document and a KIE document. If duplicate, slightly different versions of the module file exist in enterprise and community directories, update the file what will be used as the single source for both outputs.
-
Save or move the updated, consolidated module file into the relevant community content folder.
For example, if DMN-related content is duplicated in both
enterprise-only/dmnanddrools-docs/../../asciidoc/DMN, choose which duplicate to make the new source file, update the file accordingly, and save or move the updated file to the Drools../DMNfolder. Then delete the obsolete duplicate file. -
Update the
includestatements in the relevant Red Hat Business Automationmain.adocassembly to direct to the newly updated content files in the relevant community folder location.The following directory variables are supported in
includestatements that specify the content location:-
{drools-dir}: For content in
doc-content/drools-docs/src/main/asciidoc -
{jbpm-dir}: For content in
doc-content/jbpm-docs/src/main/asciidoc -
{op-dir}: For content in
doc-content/optaplanner-wb-es-docs/src/main/asciidoc -
{shared-dir}: For content in
doc-content/shared-kie-docs/src/main/asciidoc -
{enterprise-dir}: For content in
doc-content/enterprise-only
In this example, make the following changes to the Red Hat Business Automation DMN assembly and the KIE assembly:
Exampleincludestatements in enterprise assembly before single-sourcing= Designing a decision service using DMN models ... include::{enterprise-dir}/dmn/dmn-con.adoc include::{enterprise-dir}/dmn/dmn-conformance-levels-con.adoc include::{enterprise-dir}/dmn/dmn-elements-ref.adoc include::{enterprise-dir}/dmn/dmn-feel-overview-ref.adocUpdated single-sourcedincludestatements in enterprise assembly= Designing a decision service using DMN models ... include::{drools-dir}/DMN/dmn-con.adoc include::{drools-dir}/DMN/dmn-conformance-levels-con.adoc include::{drools-dir}/DMN/dmn-elements-ref.adoc include::{drools-dir}/DMN/dmn-feel-overview-ref.adocCorrespondingincludestatements in community assembly= Decision Model and Notation (DMN) ... include::DMN/dmn-con.adoc include::DMN/dmn-conformance-levels-con.adoc include::DMN/dmn-elements-ref.adoc include::DMN/dmn-feel-overview-ref.adocThe above examples are two separate assembly files (one enterprise and one community) that both point to the same DMN source files housed in the Drools community folder.
-
-
Build both the Red Hat Business Automation assembly and the community document locally to verify the changes. Use
ba-buildto build enterprise assemblies and use Maven to build community documents.For instructions on building enterprise and community documents locally, see Building and previewing.
11. Attributes (Variables)
The KIE documentation uses many attributes (variables in other languages) to make writing easier and more consistent. When authoring or modifying content, always use attributes instead of writing the text they replace in full. This way, updating the documentation to a new version or changing the URLs of all books can be done easily.
The typical, simple way:
For more information, refer to the https://access.redhat.com/documentation/en/red-hat-jboss-bpm-suite/6.4/single/user-guide/index.html[Red Hat JBoss BPM Suite 6.4 User Guide].In the example above, when releasing a new version, both the URL and the link text need to be modified. When using attributes, only the declaration of the attribute in the REPO_HOME/docs/shared/document-attributes.adoc file needs to be updated, and all links to the User Guide will look as follows:
For more information, refer to the {URL_USER_GUIDE}[{USER_GUIDE}].11.1. General Usage
The attributes in this section are used for modifying the building behavior.
- REBUILT
-
The date the documentation was last rebuilt and published.
Table 2. Values of Attribute BPM Suite BRMS Community Mon Jun 12, 2017
same as BPM Suite
TBA
- ENTERPRISE_ONLY
-
Used for elements present only in the enterprise (downstream) documentation.
Example:
ifdef::ENTERPRISE_ONLY[]
This feature is supported in {GROUP} version 6 and later.
endif::[]
Table 3. Values of Attribute BPM Suite BRMS Community set, but empty
set, but empty
TBA
- COMMUNITY_ONLY
-
Used for elements present only in the community (upstream) documentation.
Example:
ifdef::COMMUNITY_ONLY[]
You can run {GROUP} on JBoss WildFly.
endif::[]
Table 4. Values of Attribute BPM Suite BRMS Community unset
unset
TBA
11.2. Versioning
When releasing a new version of the documentation, check especially the following variables because they may need updating.
- YEAR
-
The year the documentation was published.
Table 5. Values of Attribute BPM Suite BRMS Community 2017
same as BPM Suite
TBA
- ENTERPRISE_VERSION
-
The enterprise product version, independent of context (even in the community documentation).
Do not use this attribute unless necessary. Use {PRODUCT_VERSION}instead.Table 6. Values of Attribute BPM Suite BRMS Community 7.0
same as BPM Suite
TBA
- COMMUNITY_VERSION
-
The community product version, independent of context (even in the enterprise documentation)
Do not use this attribute unless necessary. Use {PRODUCT_VERSION}instead.Table 7. Values of Attribute BPM Suite BRMS Community 7.0
same as BPM Suite
TBA
- PRODUCT_VERSION
-
The version of the product you are building the documentation for.
Table 8. Values of Attribute BPM Suite BRMS Community {ENTERPRISE_VERSION}
same as BPM Suite
TBA
- RELEASE
-
Release string (name) of the product.
Table 9. Values of Attribute BPM Suite BRMS Community Limited Availability CAP Build 2
same as BPM Suite
TBA
- BOM_VERSION
-
The Bill of Materials version.
Table 10. Values of Attribute BPM Suite BRMS Community 7.1.0.Beta2-redhat-1
same as BPM Suite
TBA
- MAVEN_ARTIFACT_VERSION
-
The Maven artifact version.
Table 11. Values of Attribute BPM Suite BRMS Community 7.0.0.CR9-redhat-1
same as BPM Suite
TBA
11.3. Product Names
The names of the products frequently referenced in the documentation set.
- PRODUCT
-
The KIE product name, dependent on which product the documentation is built for.
Table 12. Values of Attribute BPM Suite BRMS Community Red Hat JBoss BPM Suite
Red Hat JBoss BRMS
TBA
- PRODUCT_BPMSUITE
-
The BPM Suite product name, independent of context (even BRMS or community).
Table 13. Values of Attribute BPM Suite BRMS Community Red Hat JBoss BPM Suite
same as BPM Suite
TBA
- PRODUCT_BRMS
-
The BRMS product name, independent of context (even the BPM Suite or community).
Table 14. Values of Attribute BPM Suite BRMS Community Red Hat JBoss BRMS
same as BPM Suite
TBA
- PLANNER
-
The product name of the Business Resource Planner (enterprise) or Optaplanner (community).
Table 15. Values of Attribute BPM Suite BRMS Community Business Resource Planner
same as BPM Suite
TBA
- WEBSPHERE
-
The IBM WebSphere full product name.
Table 16. Values of Attribute BPM Suite BRMS Community IBM WebSphere Application Server
same as BPM Suite
TBA
- WEBSPHERE_SHORT
-
The IBM WebSphere short product name.
Do not use unless necessary. Use {WEBSPHERE}instead.Table 17. Values of Attribute BPM Suite BRMS Community IBM WebSphere
same as BPM Suite
TBA
- WEBLOGIC
-
The Oracle Weblogic full product name.
Table 18. Values of Attribute BPM Suite BRMS Community Oracle Weblogic Server
same as BPM Suite
TBA
- WEBLOGIC_SHORT
-
The Oracle Weblogic short product name.
Do not use unless necessary. Use {WEBLOGIC}instead.Table 19. Values of Attribute BPM Suite BRMS Community Oracle Weblogic
same as BPM Suite
TBA
- EAP
-
The Red Hat JBoss Enterprise Application Platform short product name.
Table 20. Values of Attribute BPM Suite BRMS Community Red Hat JBoss EAP
same as BPM Suite
TBA
- EAP_LONG
-
The Red Hat JBoss Enterprise Application Platform full product name.
Do not use unless necessary. Use {EAP}instead.Table 21. Values of Attribute BPM Suite BRMS Community Red Hat JBoss Enterprise Application Platform
same as BPM Suite
TBA
11.4. Book Names
The full names of the books from the KIE documentation set.
- ADMIN_GUIDE
-
The full name of the Administration and Configuration Guide.
Table 22. Values of Attribute BPM Suite BRMS Community {PRODUCT} Administration and Configuration Guide
same as BPM Suite
TBA
- PLANNER_GUIDE
-
The full name of the Business Resource Planner Guide.
Table 23. Values of Attribute BPM Suite BRMS Community {PRODUCT} {PLANNER} Guide
same as BPM Suite
TBA
- DEVELOPMENT_GUIDE
-
The full name of the Development Guide.
Table 24. Values of Attribute BPM Suite BRMS Community {PRODUCT_BPMSUITE} Development Guide
same as BPM Suite
TBA
- GETTING_STARTED_GUIDE
-
The full name of the Getting Started Guide.
Table 25. Values of Attribute BPM Suite BRMS Community {PRODUCT} Getting Started Guide
same as BPM Suite
TBA
- IBM_GUIDE
-
The full name of the IBM WebSphere Installation and Configuration Guide.
Table 26. Values of Attribute BPM Suite BRMS Community {PRODUCT} {WEBSPHERE_SHORT} Installation and Configuration Guide
same as BPM Suite
TBA
- INSTALLATION_GUIDE
-
The full name of the Installation Guide.
Table 27. Values of Attribute BPM Suite BRMS Community {PRODUCT} Installation Guide
same as BPM Suite
TBA
- MIGRATION_GUIDE
-
The full name of the Migration Guide.
Table 28. Values of Attribute BPM Suite BRMS Community {PRODUCT_BPMSUITE} Migration Guide
same as BPM Suite
TBA
- ORACLE_GUIDE
-
The full name of the Oracle Weblogic Installation and Configuration Guide.
Table 29. Values of Attribute BPM Suite BRMS Community {PRODUCT} {WEBLOGIC_SHORT} Guide
same as BPM Suite
TBA
- RELEASE_NOTES
-
The full name of the Release Notes.
Table 30. Values of Attribute BPM Suite BRMS Community {PRODUCT} {PRODUCT_VERSION} Release Notes
same as BPM Suite
TBA
- USER_GUIDE
-
The full name of the User Guide.
Table 31. Values of Attribute BPM Suite BRMS Community {PRODUCT} User Guide
same as BPM Suite
TBA
11.5. URL Components
Components of the URLs of the books and other links. Do not use these attributes in this section anywhere on their own, only as parts of URLs.
- URL_COMPONENT_FORMAT
-
The URL component containing the view format of the documentation. Usually
singleorpaged.Table 32. Values of Attribute BPM Suite BRMS Community single
same as BPM Suite
TBA
- URL_BASE_ENTERPRISE
-
The base URL of all enterprise books.
Table 33. Values of Attribute BPM Suite BRMS Community same as BPM Suite
TBA
- URL_BASE_BPMSUITE
-
The base URL for books that are only published for the BPM Suite.
Table 34. Values of Attribute BPM Suite BRMS Community same as BPM Suite
TBA
- URL_COMPONENT_PRODUCT
-
The product name URL component.
Table 35. Values of Attribute BPM Suite BRMS Community red-hat-jboss-bpm-suite
red-hat-jboss-brms
TBA
11.6. Book URLs
The full URLs to the current versions of the books in the KIE documentation set.
- URL_ADMIN_GUIDE
-
The full URL of the Administration and Configuration Guide.
Table 36. Values of Attribute BPM Suite BRMS Community {URL_BASE_ENTERPRISE}/administration-and-configuration-guide
same as BPM Suite
TBA
- URL_DEVELOPMENT_GUIDE
-
The full URL of the Development Guide.
This books is published only for the BPM Suite. Table 37. Values of Attribute BPM Suite BRMS Community {URL_BASE_BPMSUITE}/development-guide
same as BPM Suite
TBA
- URL_GETTING_STARTED_GUIDE
-
The full URL of the Getting Started Guide.
Table 38. Values of Attribute BPM Suite BRMS Community {URL_BASE_ENTERPRISE}/getting-started-guide
same as BPM Suite
TBA
- URL_IBM_GUIDE
-
The full URL of the IBM WebSphere Administration and Configuration Guide.
Table 39. Values of Attribute BPM Suite BRMS Community {URL_BASE_ENTERPRISE}/ibm-websphere-installation-and-configuration-guide
same as BPM Suite
TBA
- URL_INSTALLATION_GUIDE
-
The full URL of the Installation Guide.
Table 40. Values of Attribute BPM Suite BRMS Community {URL_BASE_ENTERPRISE}/installation-guide
same as BPM Suite
TBA
- URL_ORACLE_GUIDE
-
The full URL of the Oracle Weblogic Installation and Configuration Guide.
Table 41. Values of Attribute BPM Suite BRMS Community {URL_BASE_ENTERPRISE}/oracle-weblogic-administration-and-configuration-guide
same as BPM Suite
TBA
- URL_RELEASE_NOTES
-
The full URL of the Release Notes.
The URL must be updated with every major release of the documentation because the product version string is part of it. Table 42. Values of Attribute BPM Suite BRMS Community {URL_BASE_ENTERPRISE}/70release-notes
same as BPM Suite
TBA
- URL_MIGRATION_GUIDE
-
The full URL of the Migration Guide.
This book is published only for the BPM Suite. Table 43. Values of Attribute BPM Suite BRMS Community {URL_BASE_BPMSUITE}/migration-guide
same as BPM Suite
TBA
- URL_USER_GUIDE
-
The full URL of the User Guide.
Table 44. Values of Attribute BPM Suite BRMS Community {URL_BASE_ENTERPRISE}/user-guide
same as BPM Suite
TBA
12. Corporate-specific style requirements
For all Red Hat documentation published to the Red Hat Customer Portal, follow the style conventions prescribed in these resources:
-
The IBM Style Guide: The primary reference for Red Hat product documentation. For a condensed IBM editorial resource online, see the developerWorks editorial style guide.
-
The Red Hat Glossary of Terms and Conventions for Product Documentation: The supplemental reference for Red Hat product documentation that specifies style considerations that are not in or that differ from The IBM Style Guide.
-
Chicago Manual of Style: The general reference for all other style considerations not covered in The IBM Style Guide or the Red Hat Glossary of Terms and Conventions for Product Documentation.
13. Contact information
If you have questions about KIE/BA technical documentation or the guidelines described in this document, contact community or enterprise correspondents as needed. They will be happy to assist you.
- KIE community contact
-
For questions about the KIE community, join one of the following channels at
chat.freenode.net:-
#droolsfor Drools-related discussions -
#jbpmfor jBPM-related discussions -
#guvnorfor Guvnor-related discussions -
#optaplannerfor OptaPlanner-related discussions -
#logicabyssfor general public discussions
To keep yourself informed about the latest developments in the community documentation, subscribe to the Drools Development Google Group (check daily for updates).
-
- Red Hat Business Automation contact
-
For questions about Red Hat Business Automation, send an e-mail to brms-docs@redhat.com or file an issue on the JBoss JIRA under the project BXMSDOC.
Appendix A: Version Information
Document last updated September 2018